XBlox
XBlox is Tanit's visual automation language: connect a few blocks, run the
flow, and keep it as a reusable tool. It is useful for the small jobs that sit
between applications, files, devices, and services — fetch data, inspect a
screen, record media, transform a document, or react to a sensor.
The executor is native C++ and shared by the desktop UI and CLI. It starts
quickly, adds only a small footprint, and does not require a separate Node or
Rust runtime for the core path.
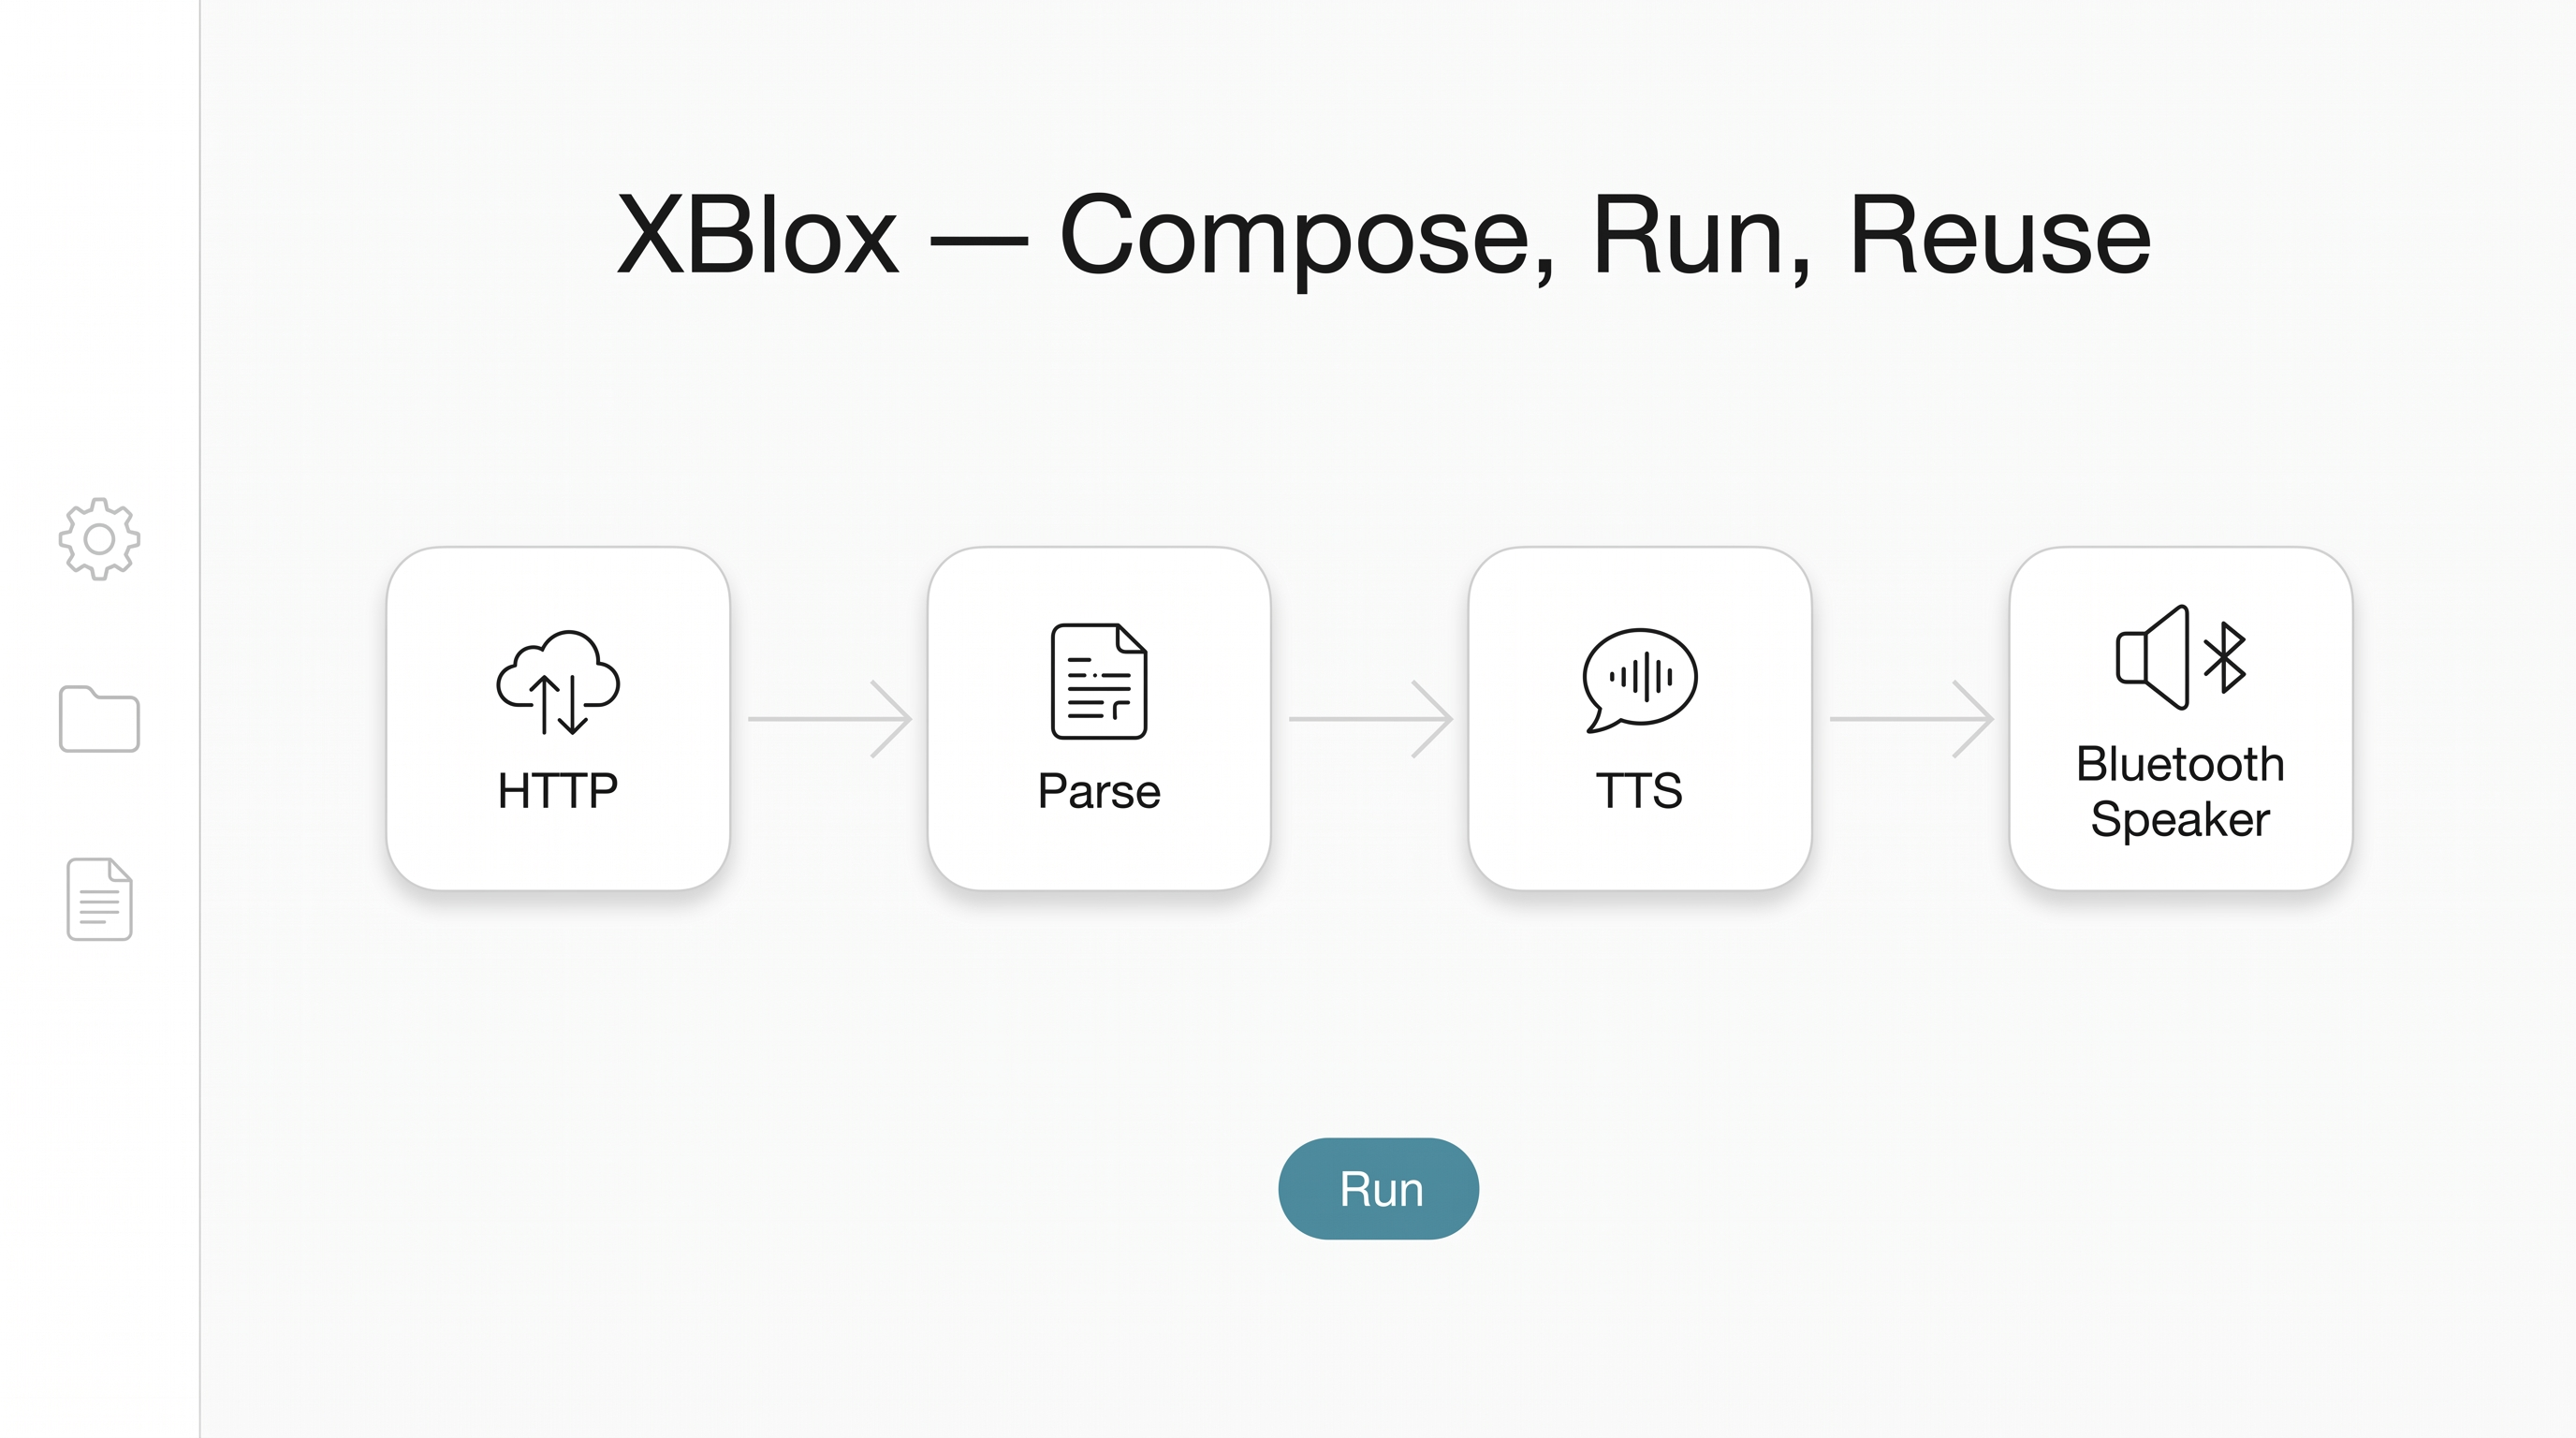
Compose a flow, run it, then reuse it as a tool.
One flow, many surfaces
An .xblox flow is not tied to the editor. The same document can run from the
visual canvas, appear as a live example inside Markdown, launch from a ribbon
or Explorer command, become a button on a custom Page Builder page, appear as
a new MCP tool, or execute unattended with tanit-cli xblox run.
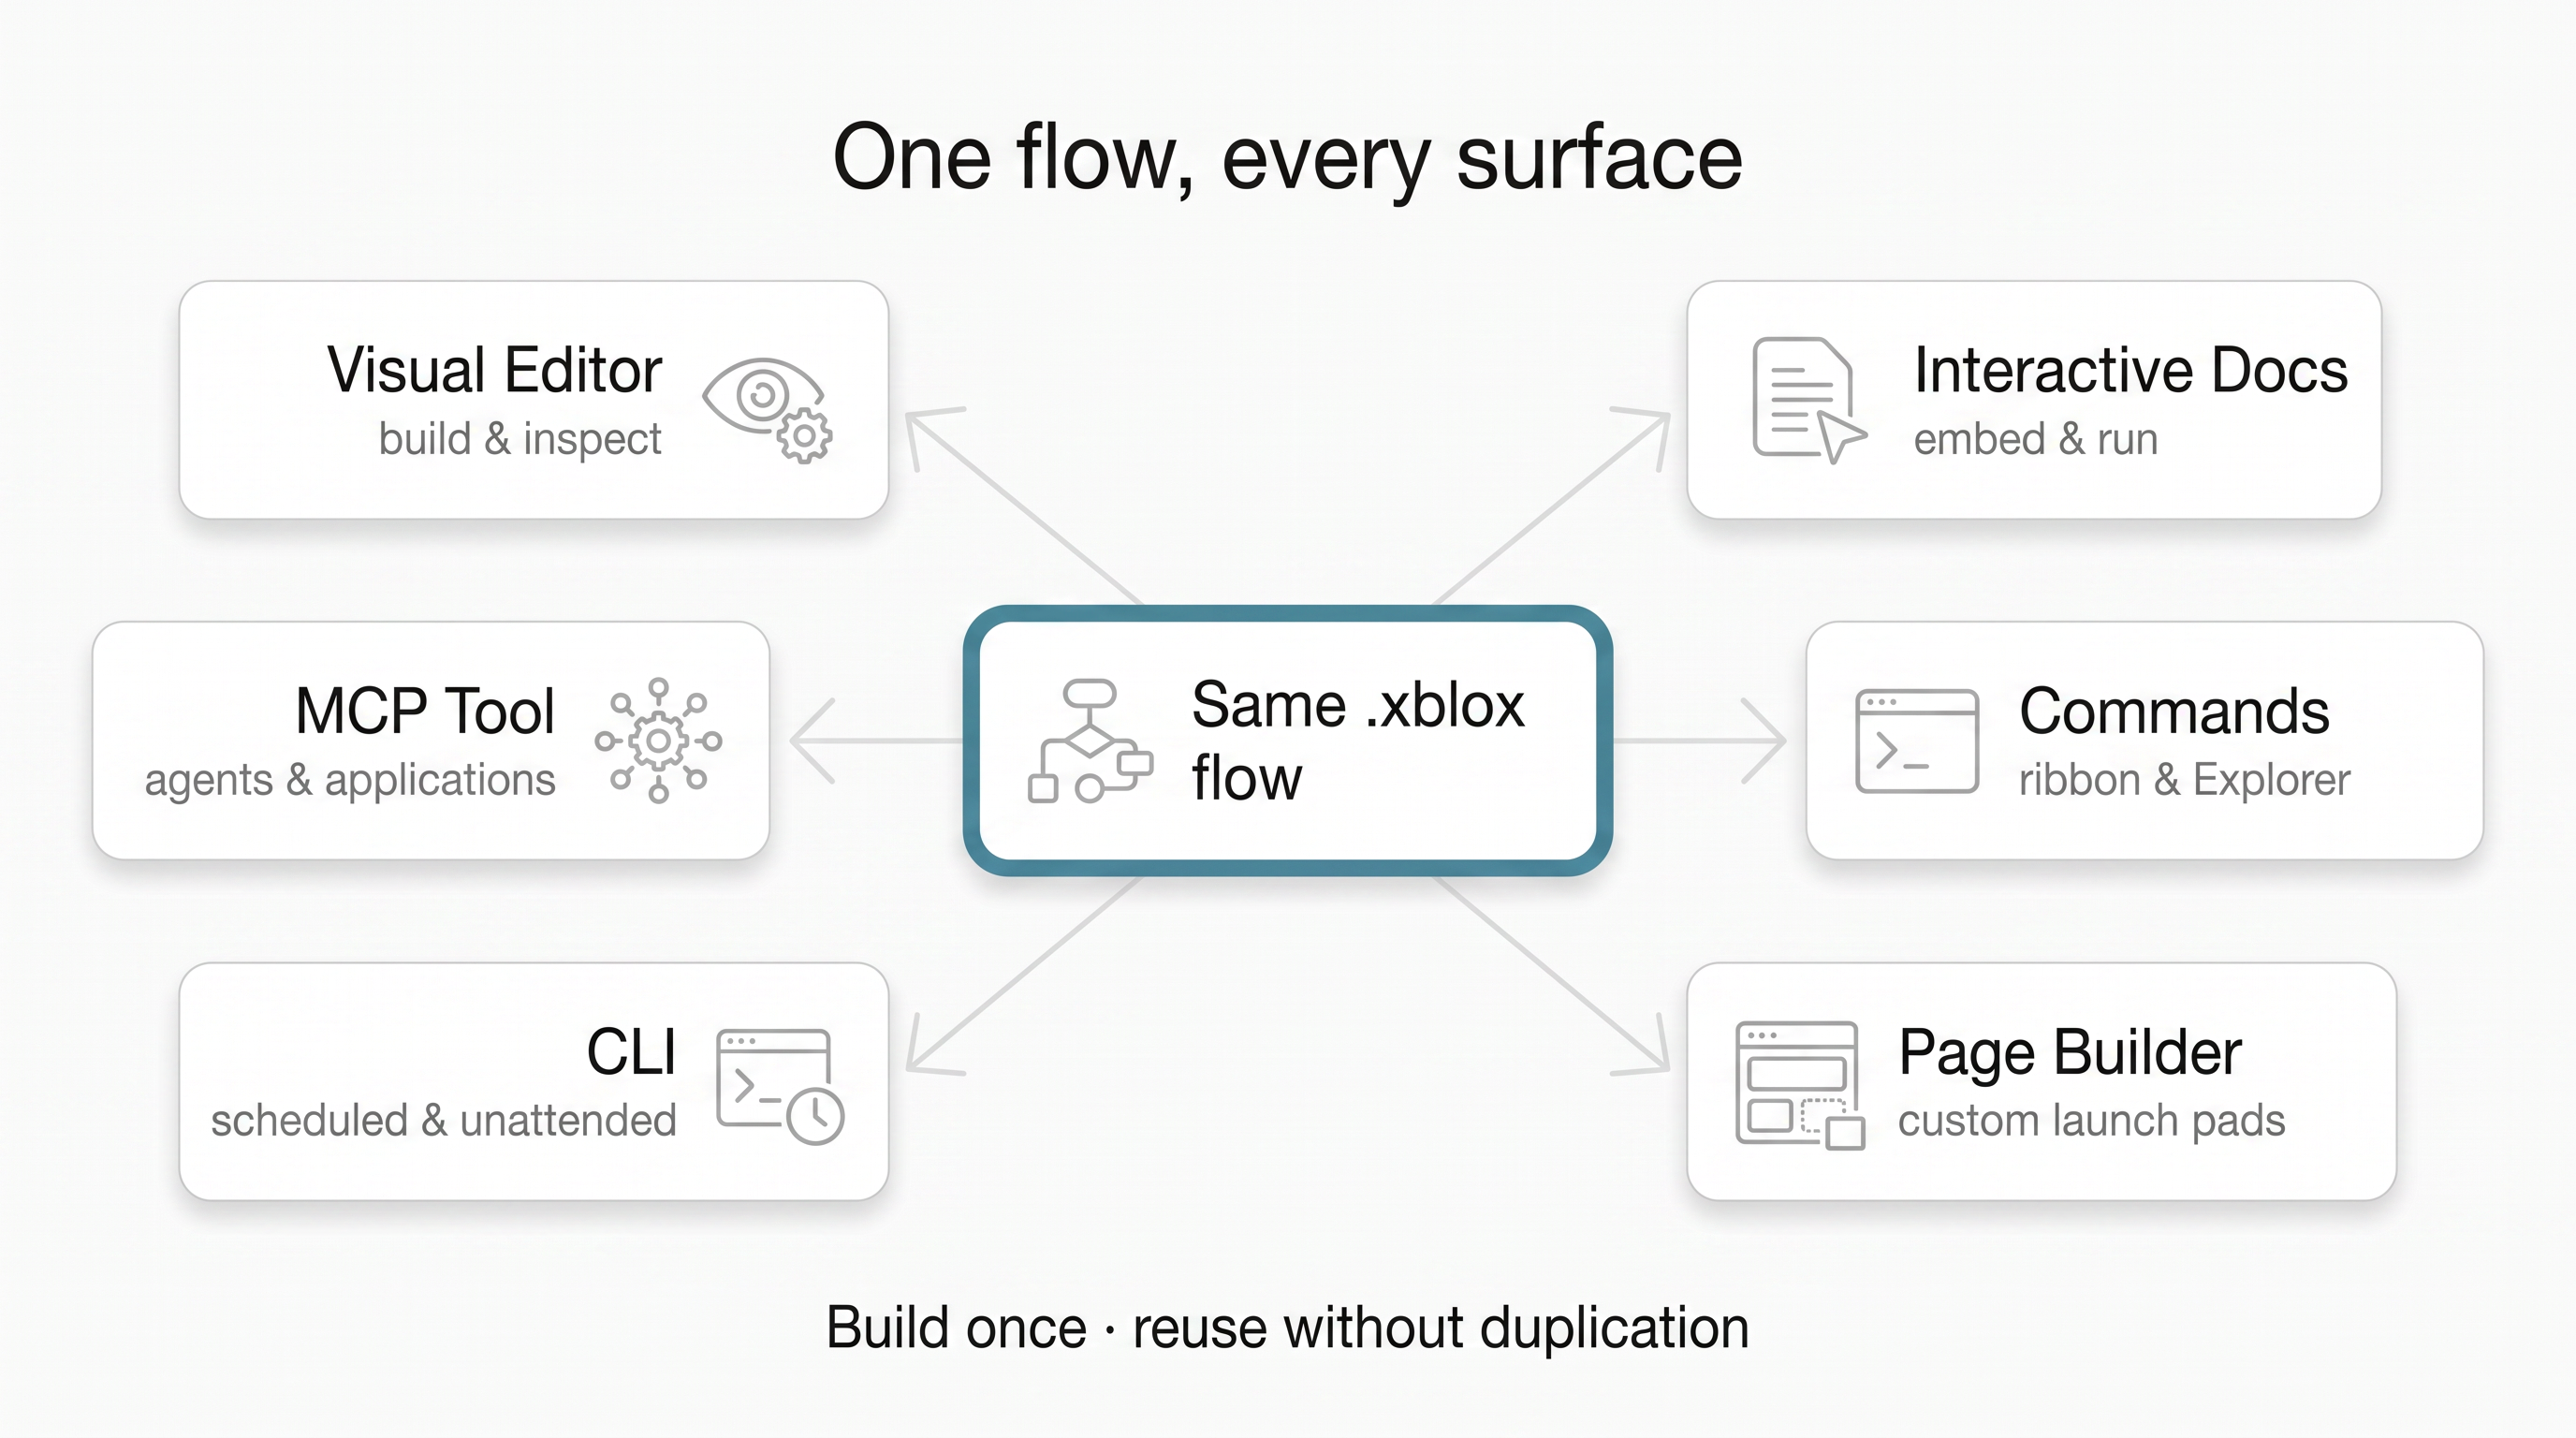
Build once, then reuse the same flow in the editor, interactive docs,
commands, custom pages, CLI, and MCP clients.
Build custom launch pads
The built-in Page Builder can turn commands and XBlox flows into focused pages
for a team, room, device, or recurring job. Add button widgets, group them into
tabs and containers, then assign each button an XBlox command. The page becomes
a simple launch pad while the reusable .xblox file remains the source of the
workflow.
Buttons can sit beside app commands, links, and other tools, with their own
label, icon, tint, tooltip, arguments, and disabled state. At runtime they also
reflect whether a flow is active or has failed. This makes purpose-built
control panels possible without creating another application.
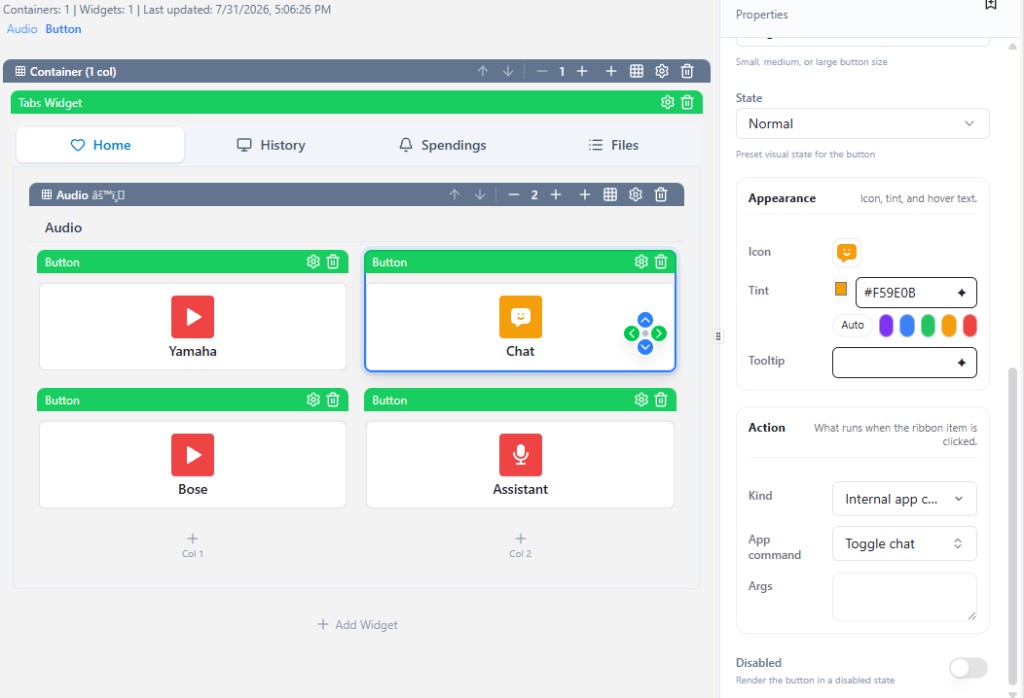
Compose a custom page from tabs, containers, and command buttons—including
buttons backed by XBlox flows.
Expose flows as MCP tools
An XBlox script can also be published as a new MCP tool. MCP-compatible agents
and applications can then discover the flow, supply its inputs, and invoke the
same reviewed automation without needing to understand its internal blocks.
This turns any useful flow into a reusable capability: a local OCR pipeline, a
document translator, a Modbus operation, a recorder, or a multi-service
workflow can become one well-described tool. The flow stays editable in XBlox,
while MCP provides the portable interface for using it from other assistants
and applications.
A map of inputs and actions
XBlox can listen to local inputs, communicate over common protocols, transform
data, and send results back to applications, devices, or services. AI and MCP
are available as optional steps rather than requirements.
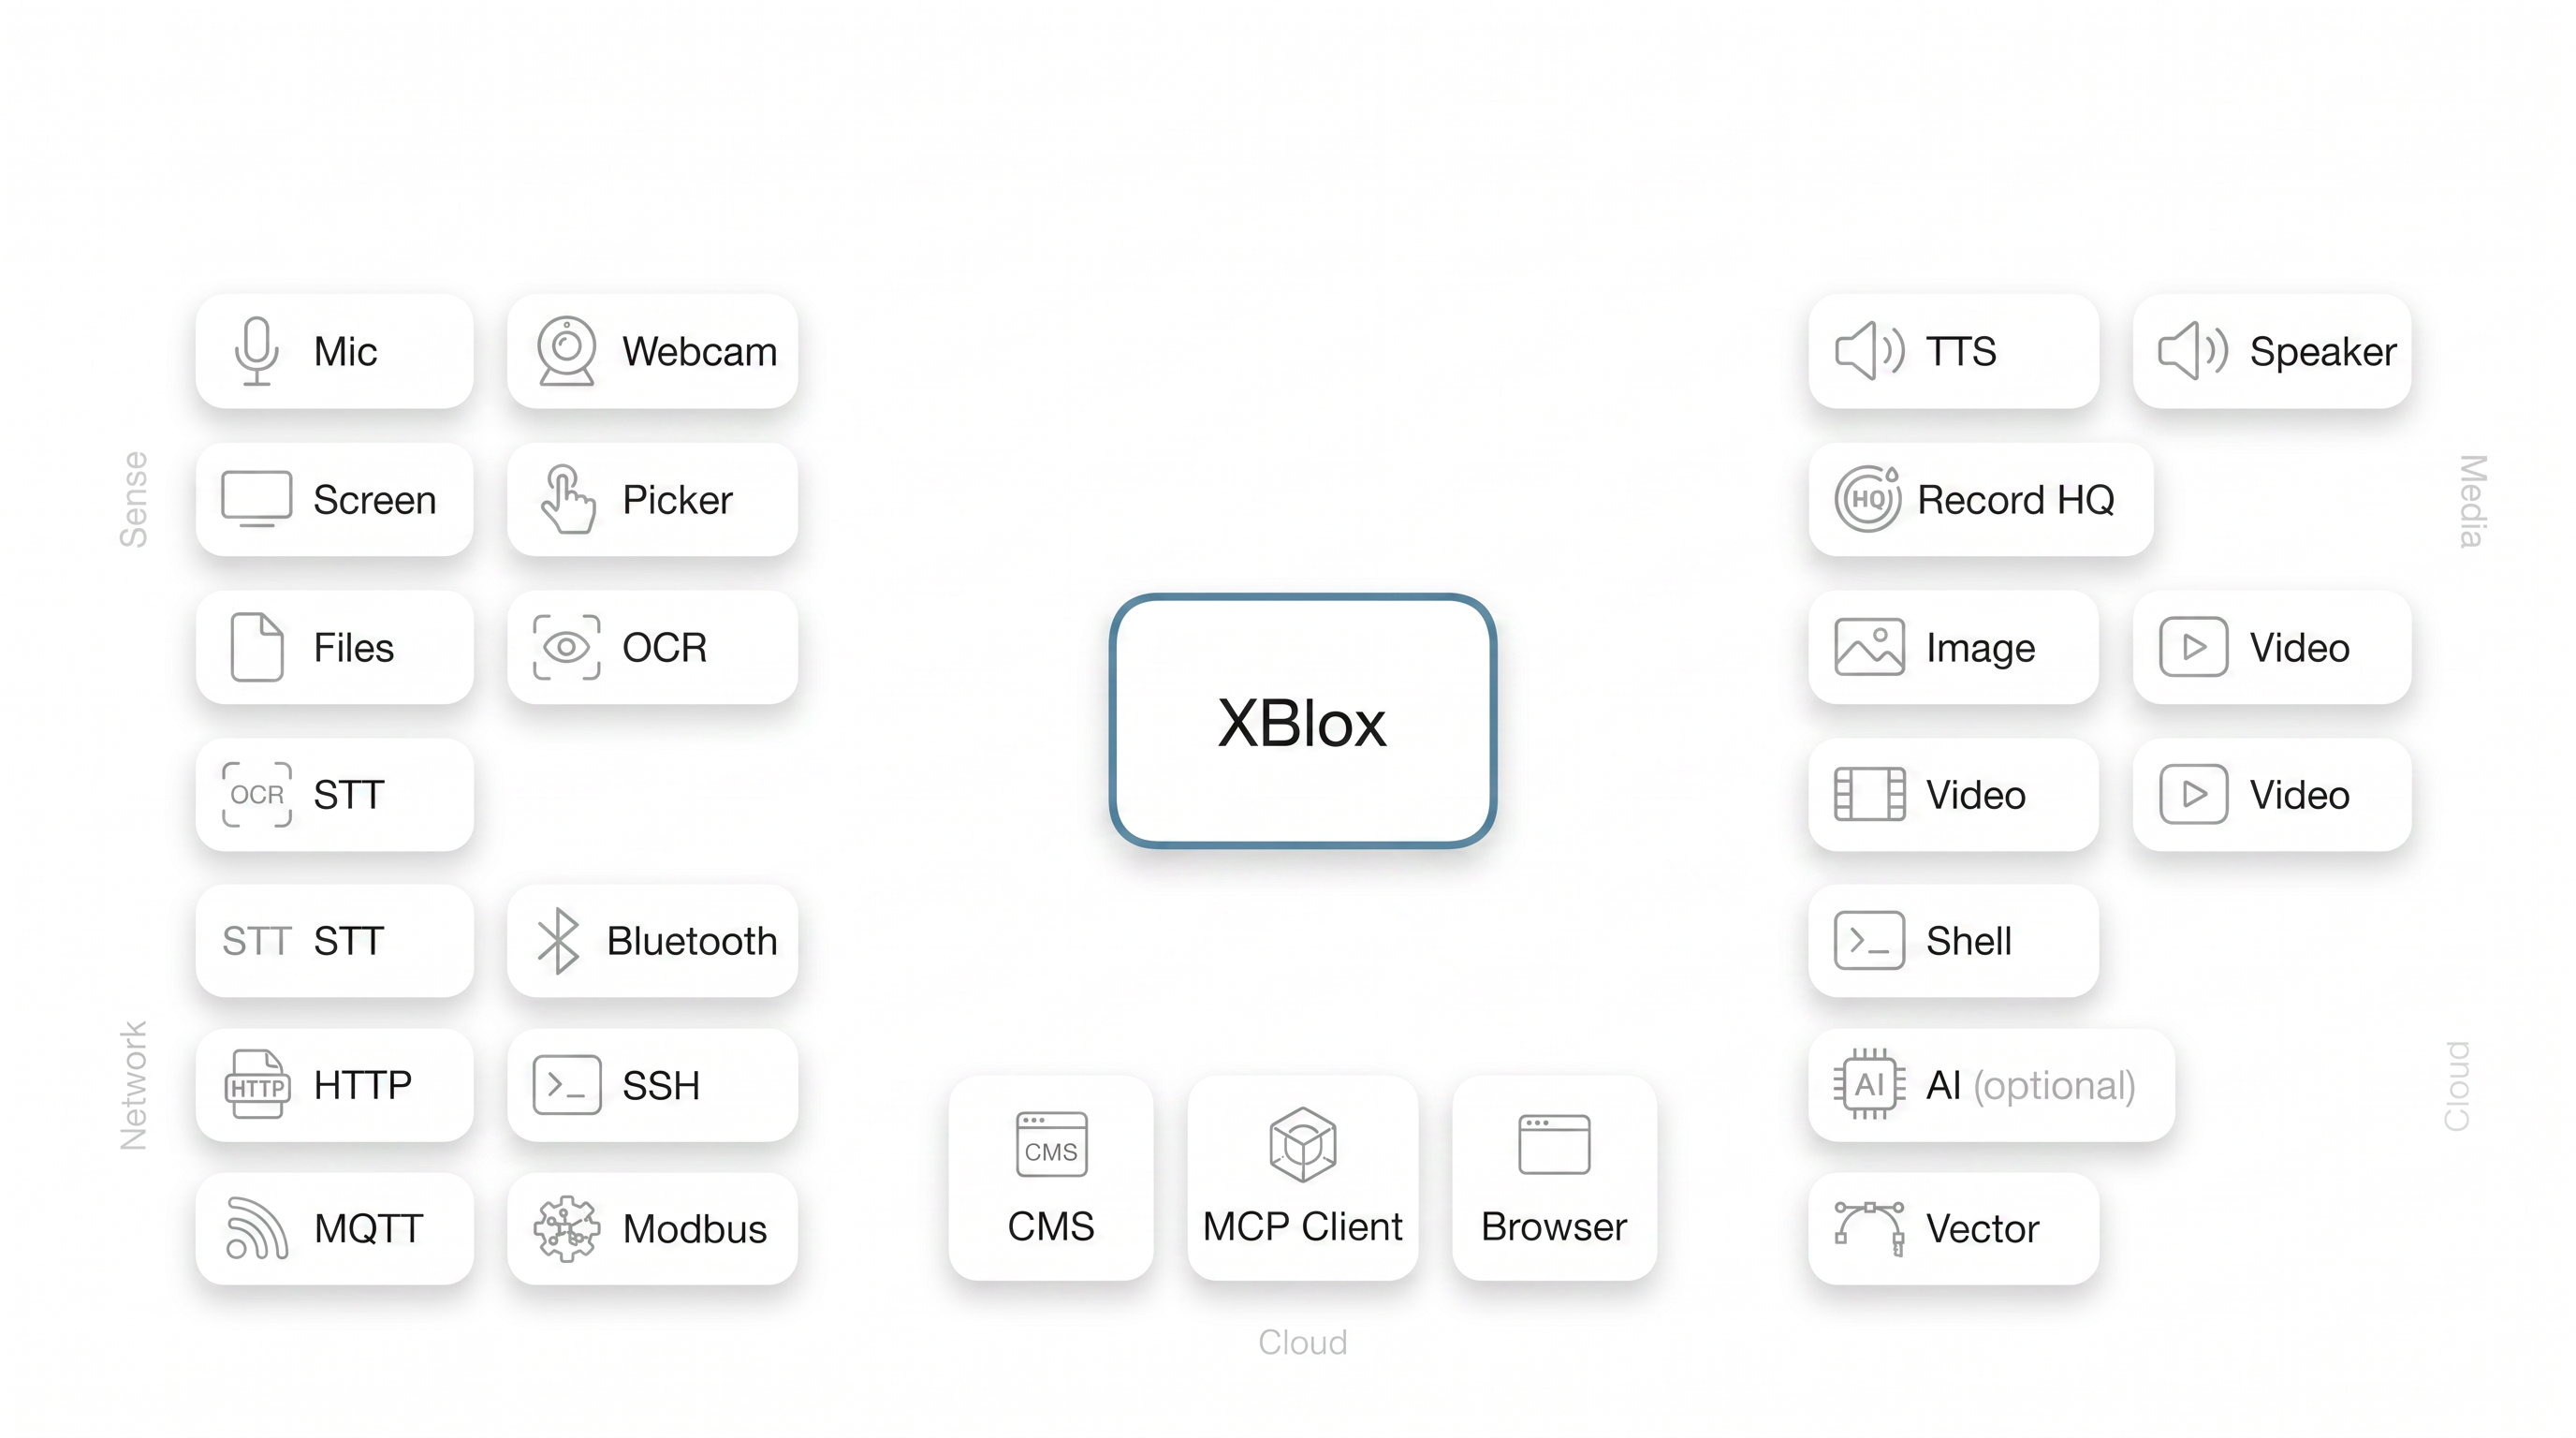
Mic, webcam, screen, picker, files, OCR and STT · Bluetooth, HTTP, SSH, MQTT
and Modbus · CMS, MCP and browser · TTS, speaker, HQ recording, image, video,
shell and optional AI.
Examples
Weather to speaker
A useful flow can be only four blocks: retrieve a weather report over HTTP,
extract the relevant text, turn it into speech, and play it through a local or
Bluetooth speaker.
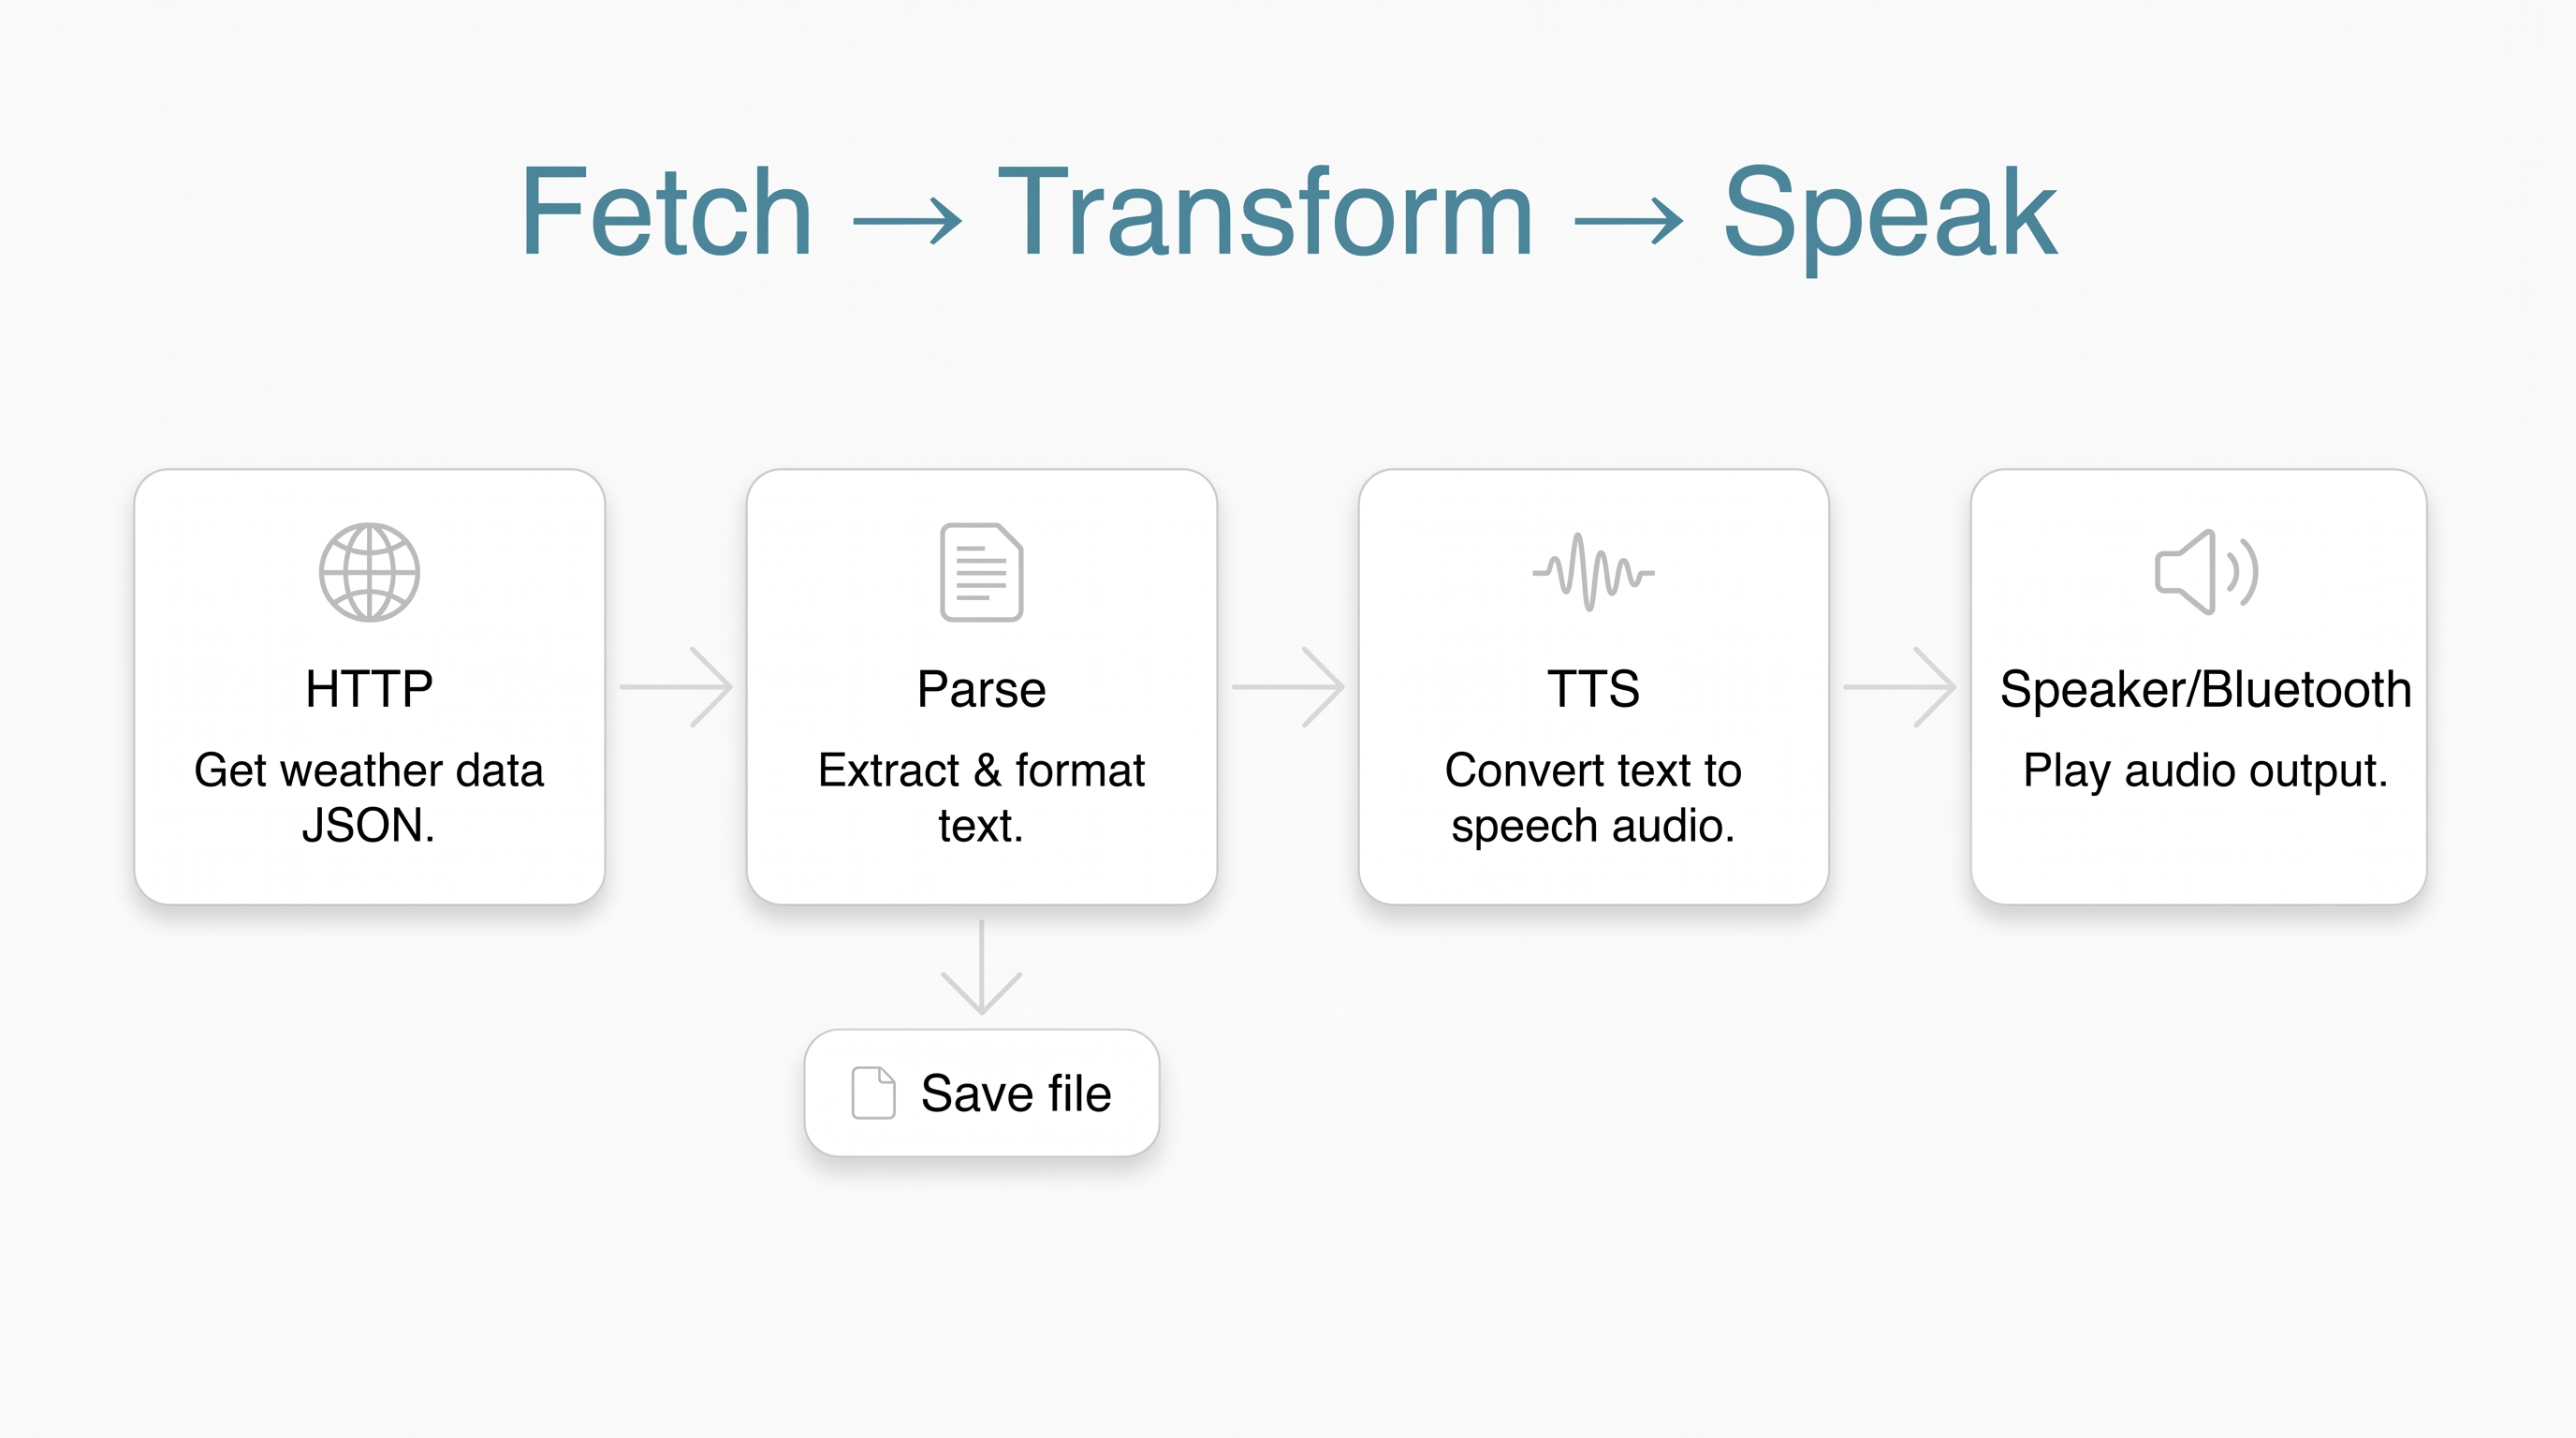
HTTP → parse → TTS → speaker.
Voice journal
This shipped flow starts a microphone recording and, when the run ends, stops
the session and transcribes the audio locally with Whisper. It appends a
timestamped entry to Documents/journal.txt, pastes the transcript into the
focused control, opens the journal, and speaks a short confirmation.
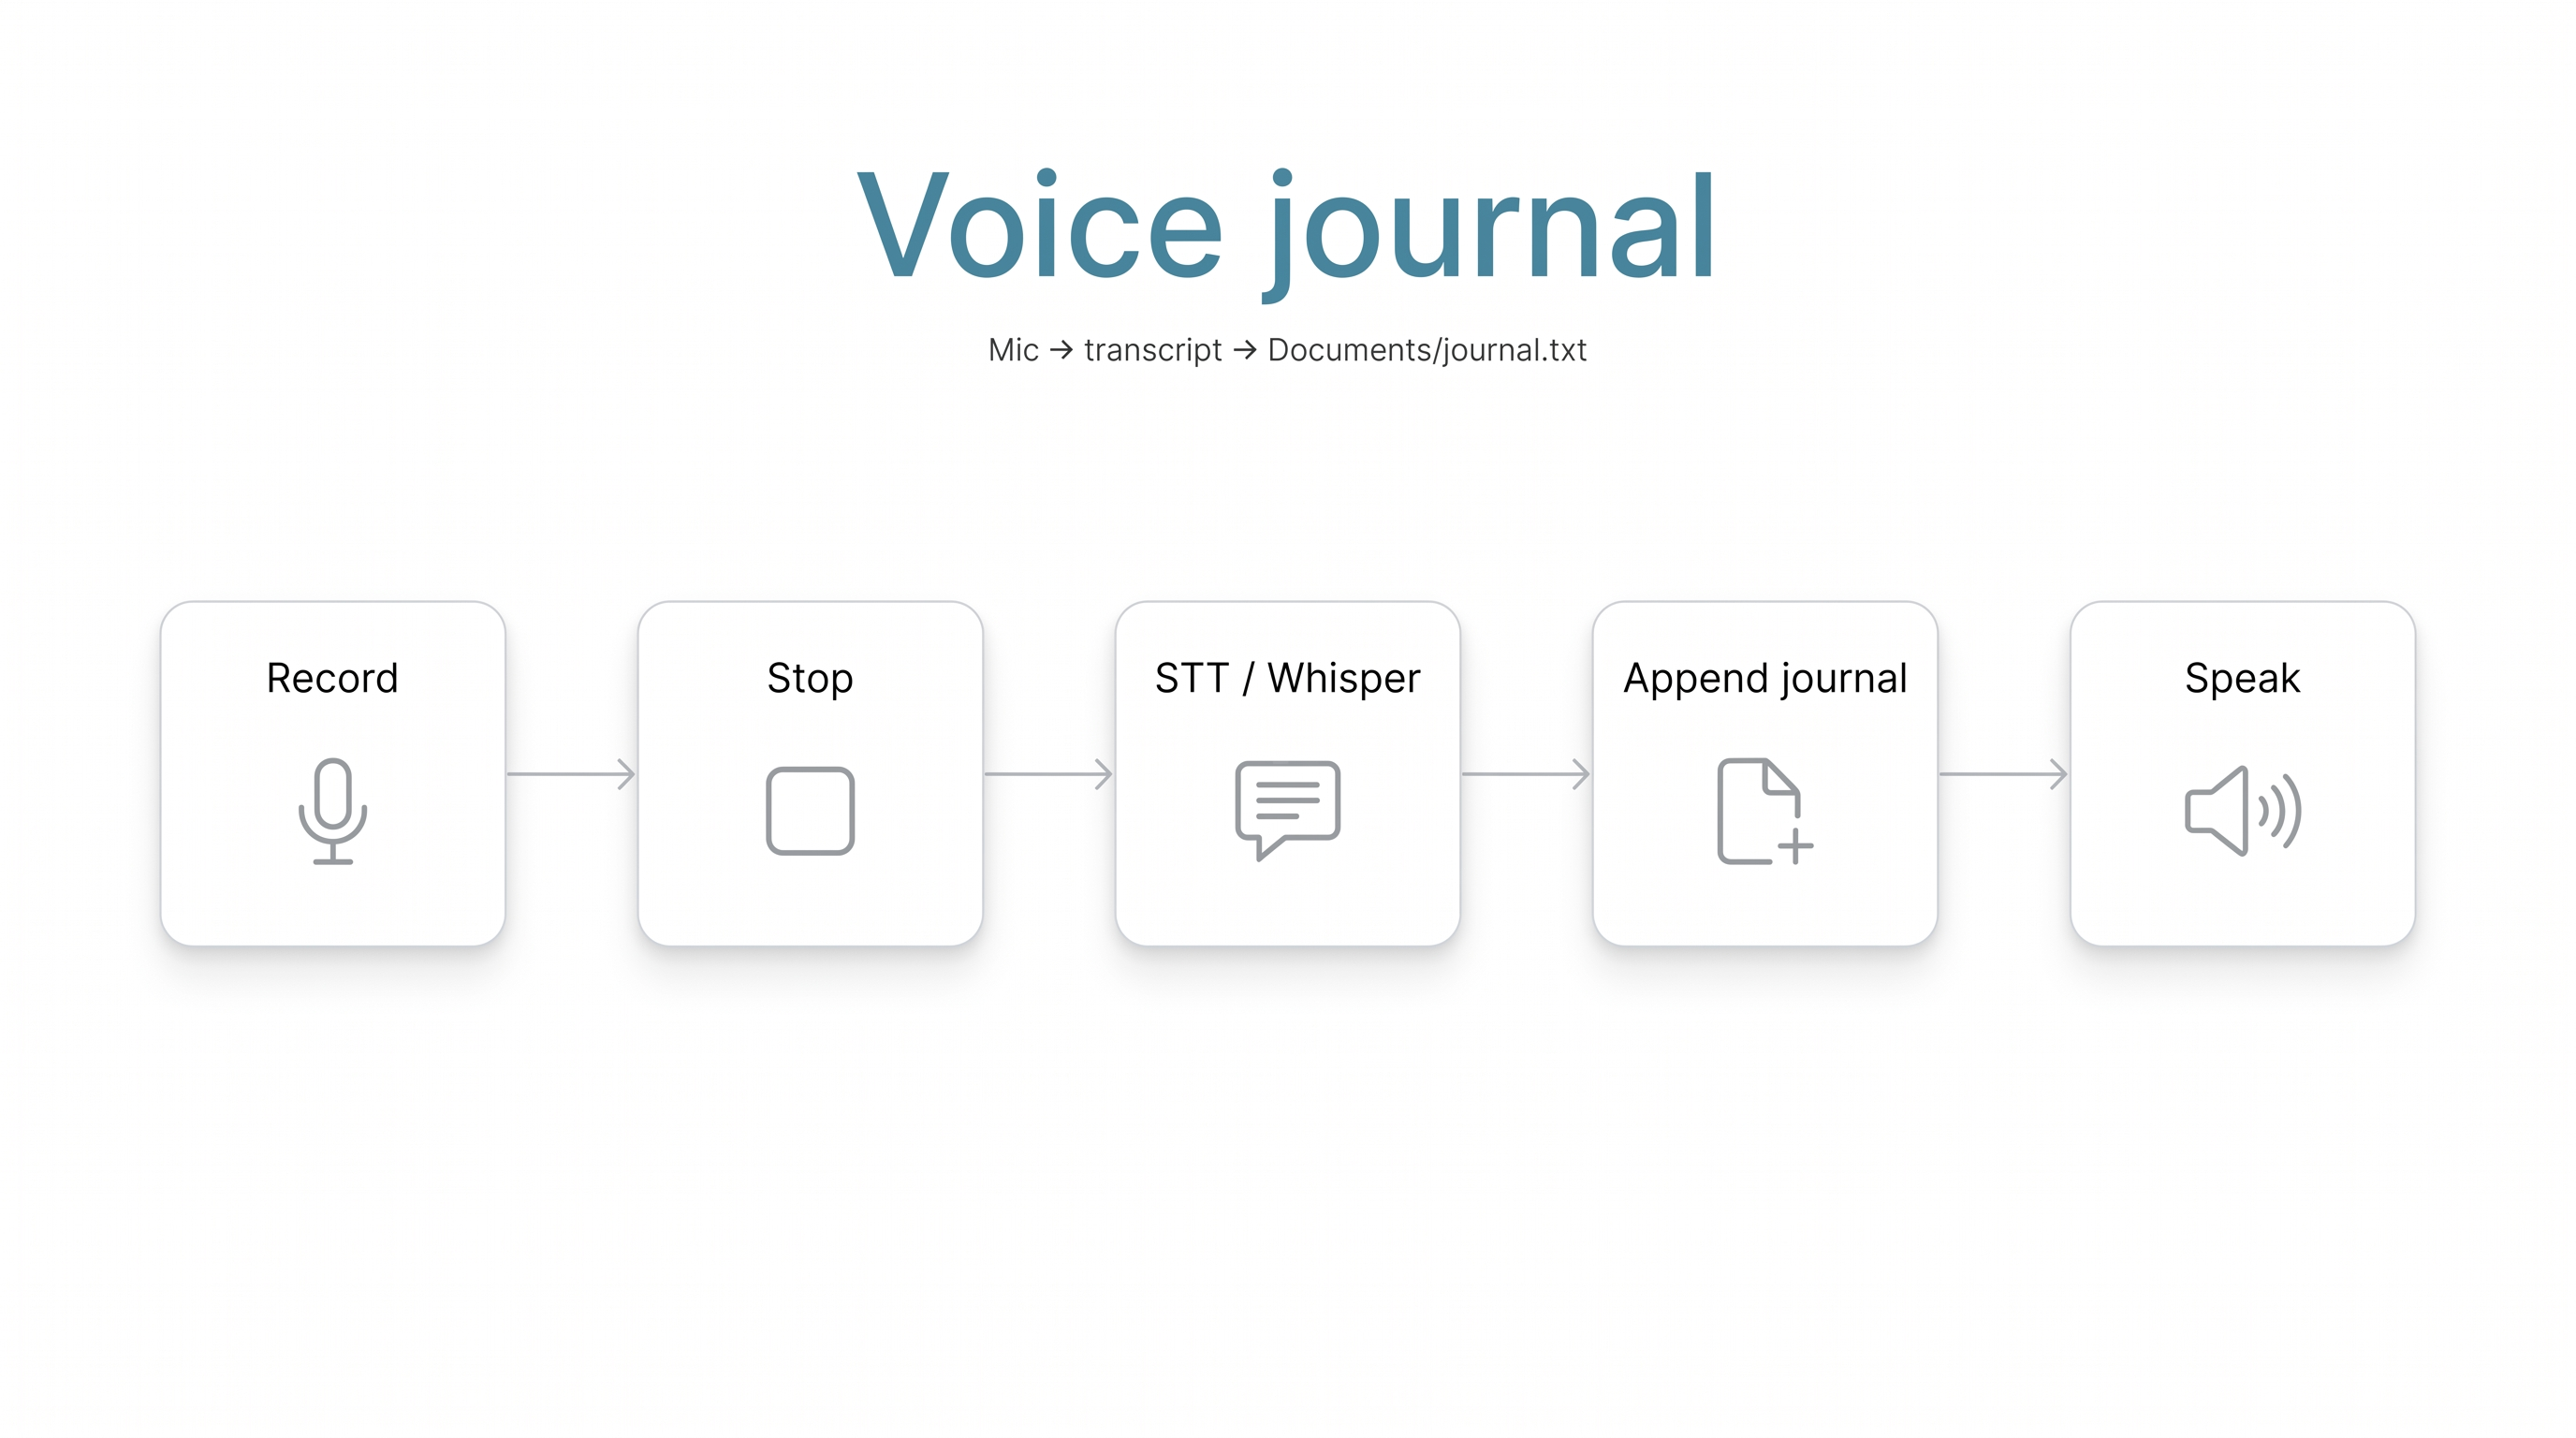
tanit-cli xblox run --src tests/xblox/stt-journal-ex.xblox
Source: tests/xblox/stt-journal-ex.xblox
Receipt to CSV
Select a receipt or another image containing tabular data. A local vision model
extracts the visible rows, the flow parses the response as CSV, and writes a.csv file beside the source image. The extraction step does not require a
cloud round trip. Additionally, we support Replicate, a service enabling access to over 400 models, specialized for certain tasks from vision, generative AI - for images, text, video and audio.
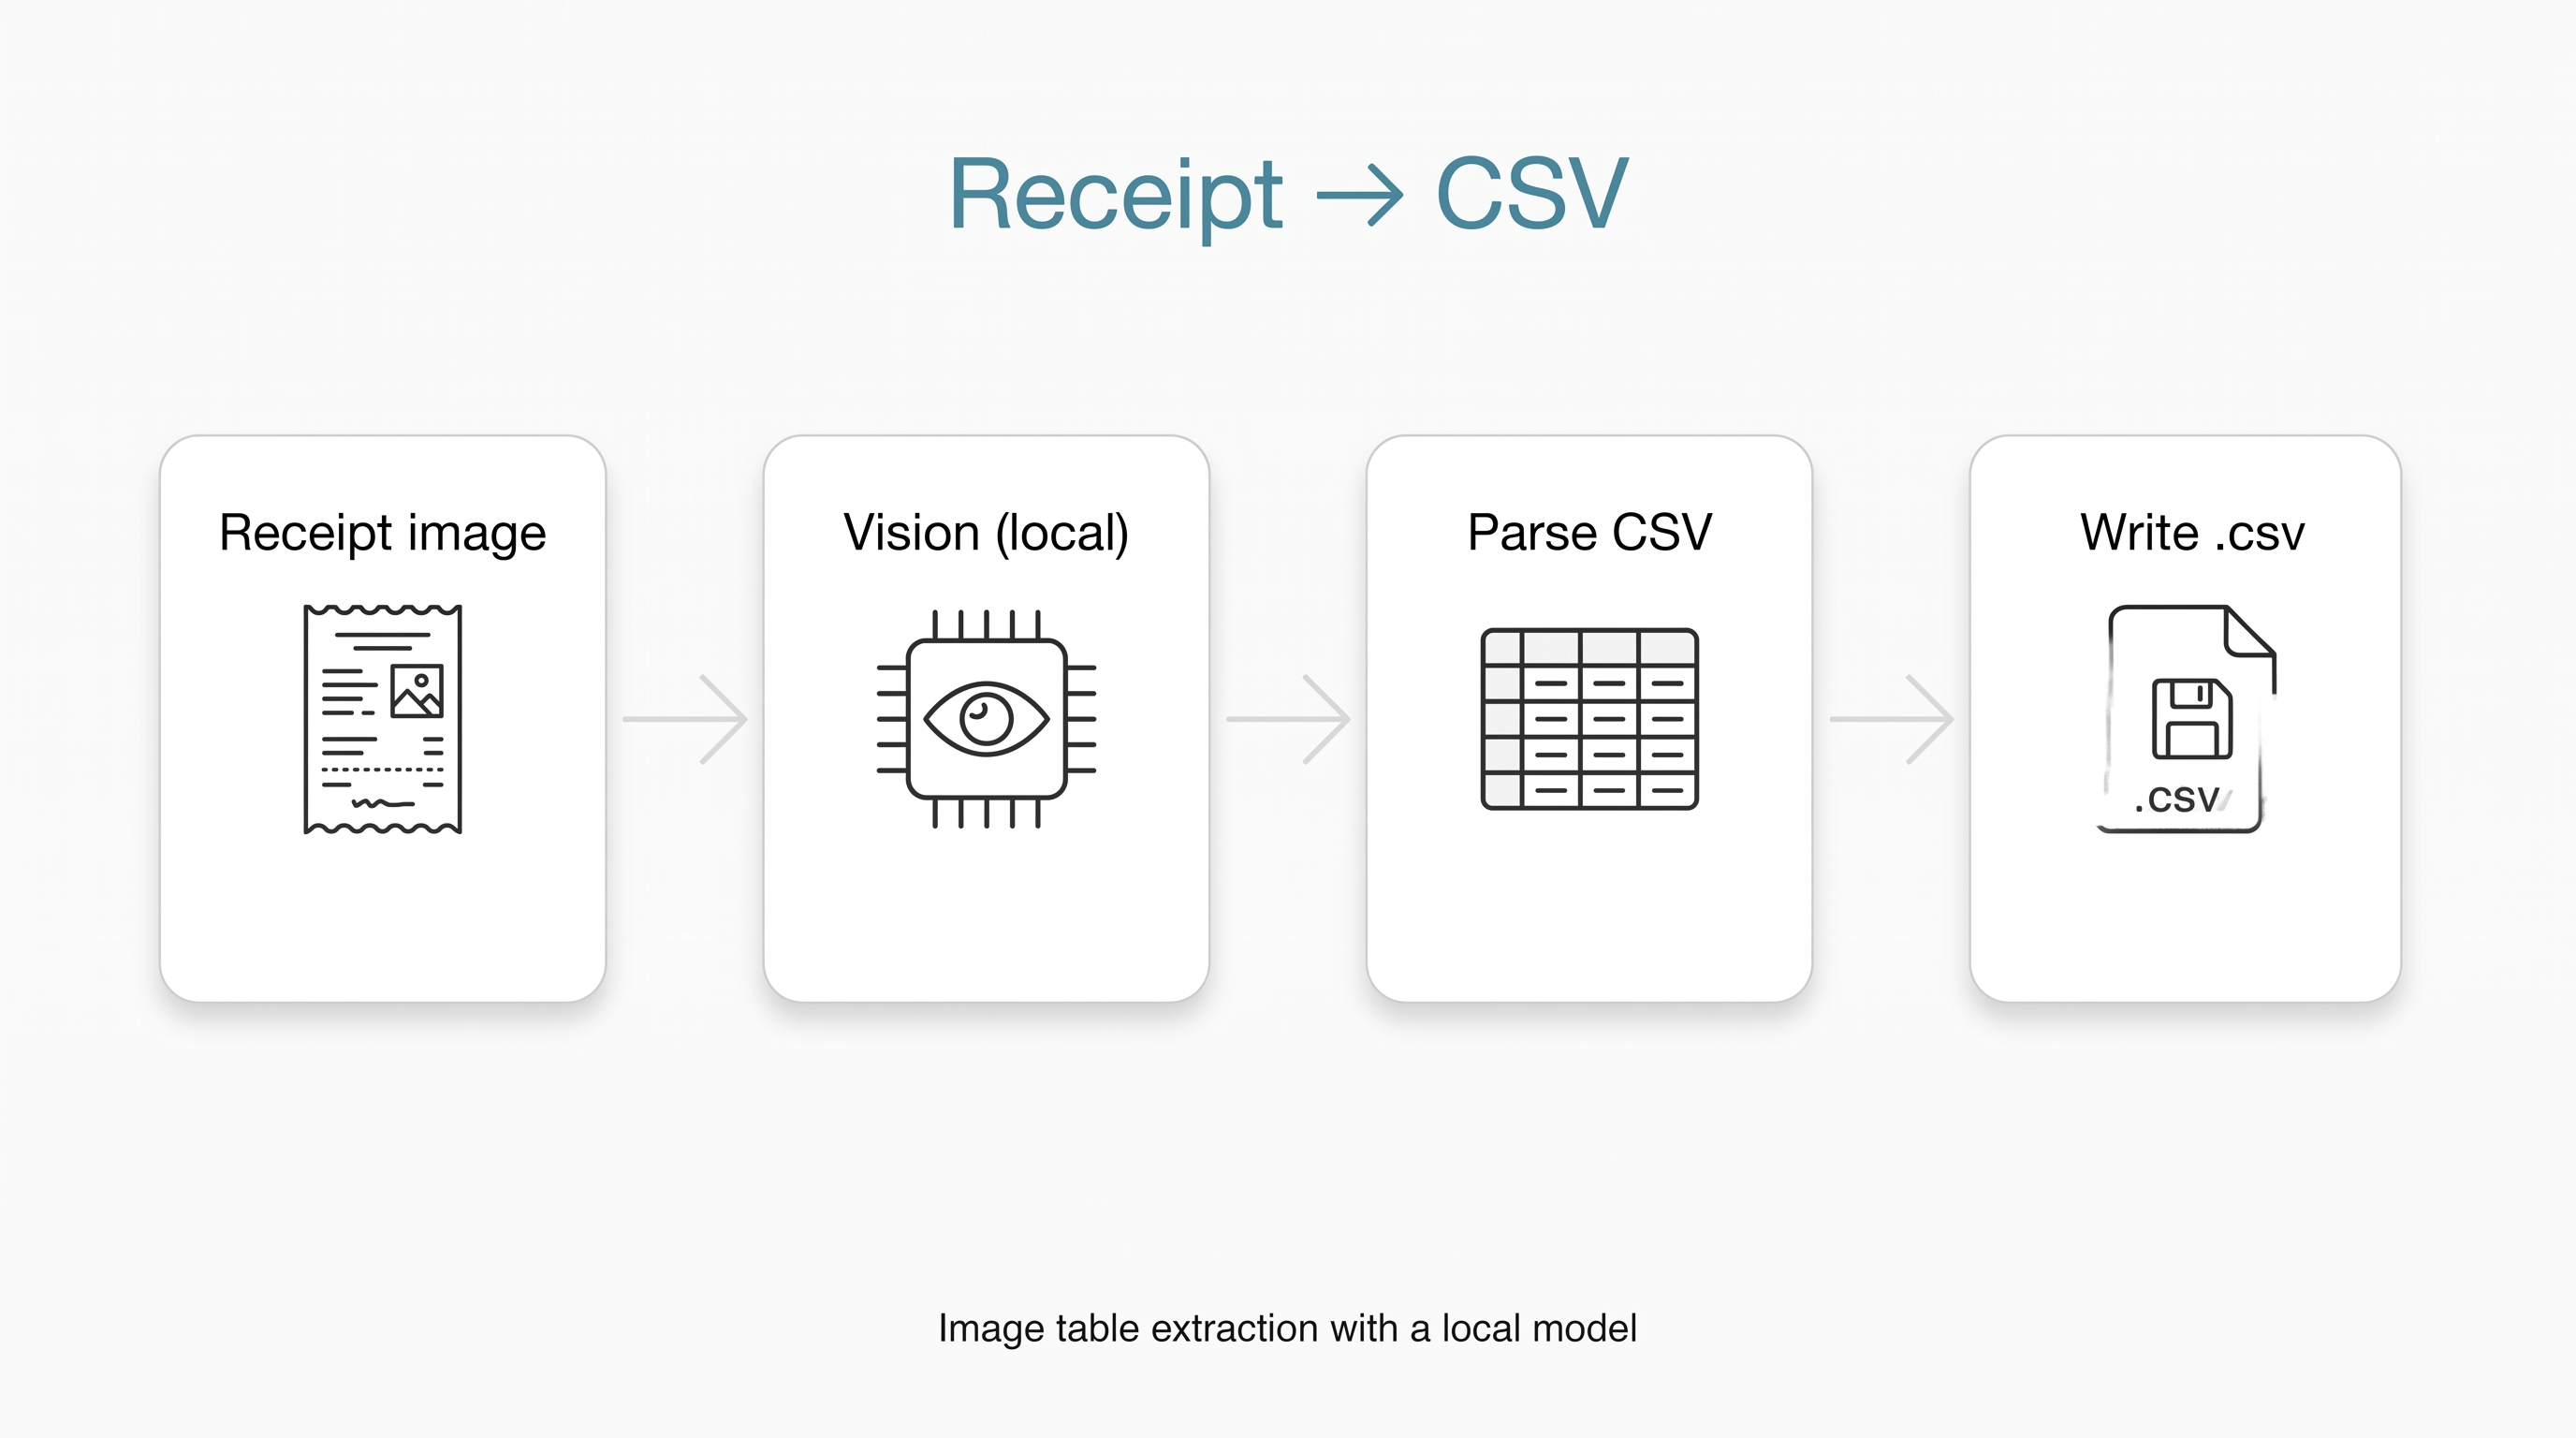
tanit-cli xblox run --src dist/shared/xblox/vision-pipe.xblox
Source: dist/shared/xblox/vision-pipe.xblox
Translate a document with DeepL
Select a document and run the DeepL example to translate it into German (or
change the flow's lang context value). XBlox hashes the source and reuses an
existing translated file when the cache matches. Otherwise it uploads the
document, polls the DeepL job, downloads the result, and saves it beside the
source as name_DE.ext.
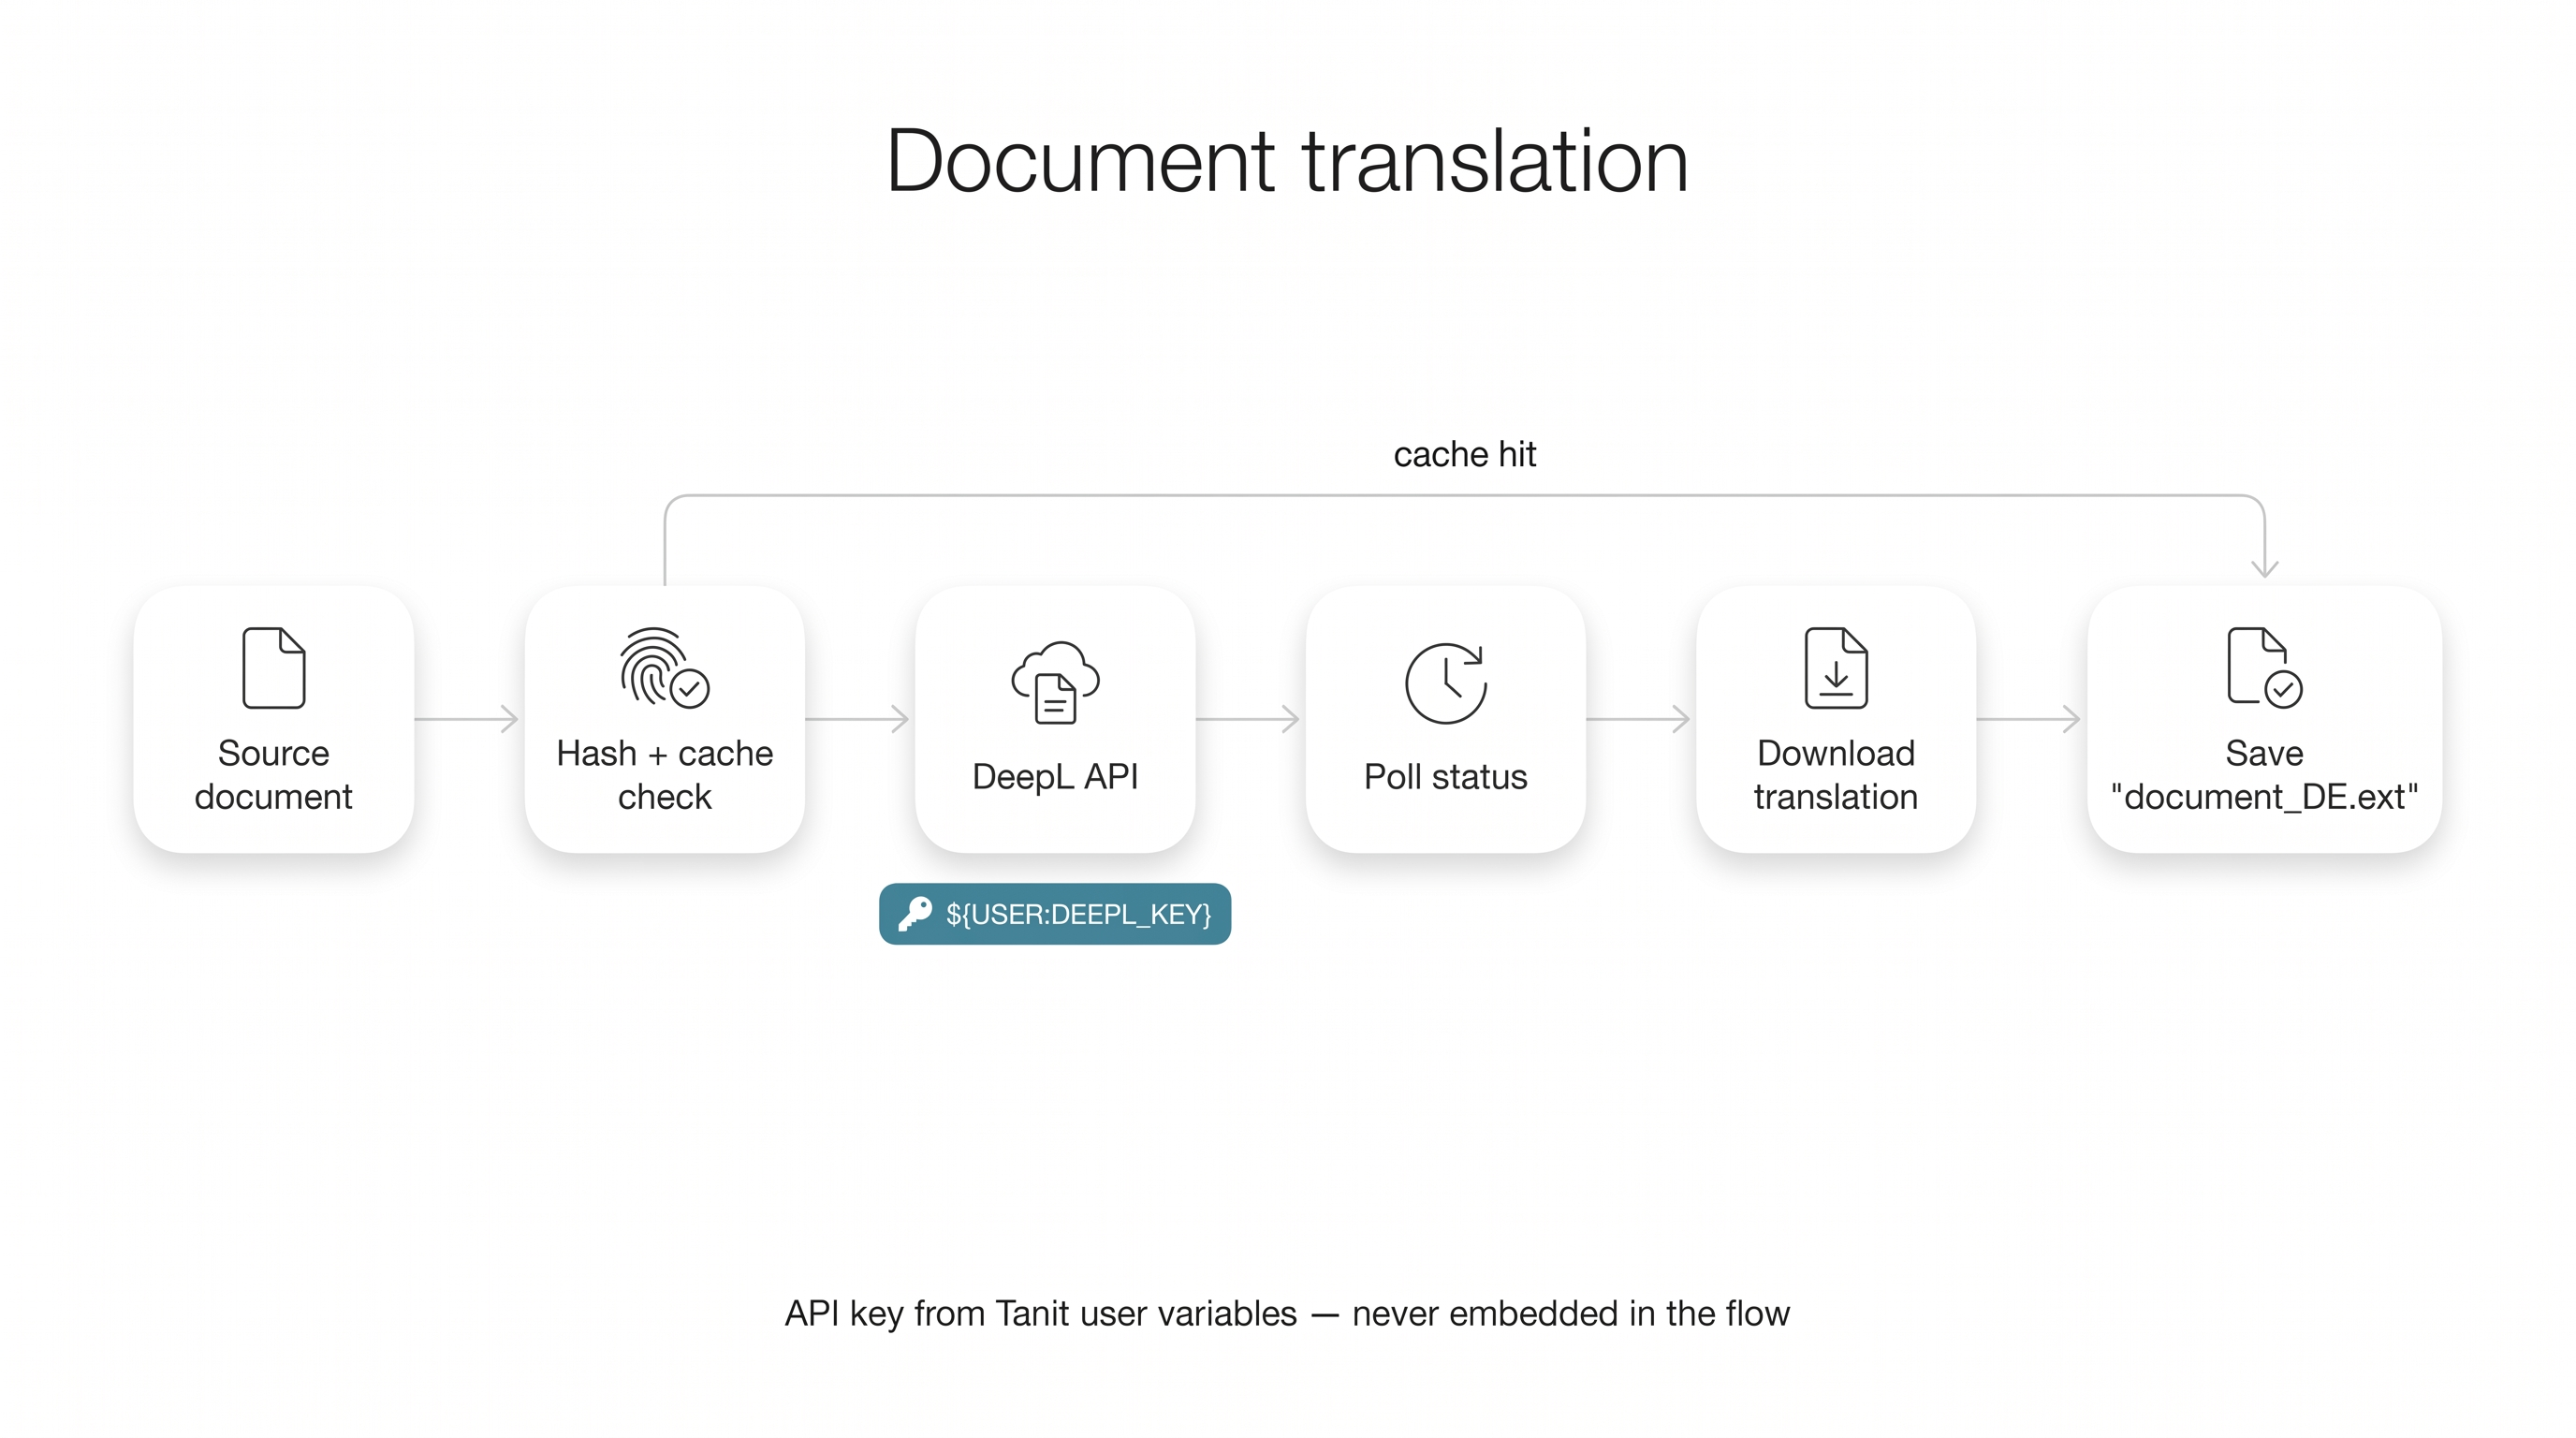
The API key comes from the Tanit user variable DEEPL_KEY:
${USER}
Set it once under Settings → Variables. The flow sends it as theDeepL-Auth-Key header but does not embed the secret in the .xblox file.
tanit-cli xblox run --src tests/xblox/network-deepl.xblox
Source: tests/xblox/network-deepl.xblox
Pick and speak
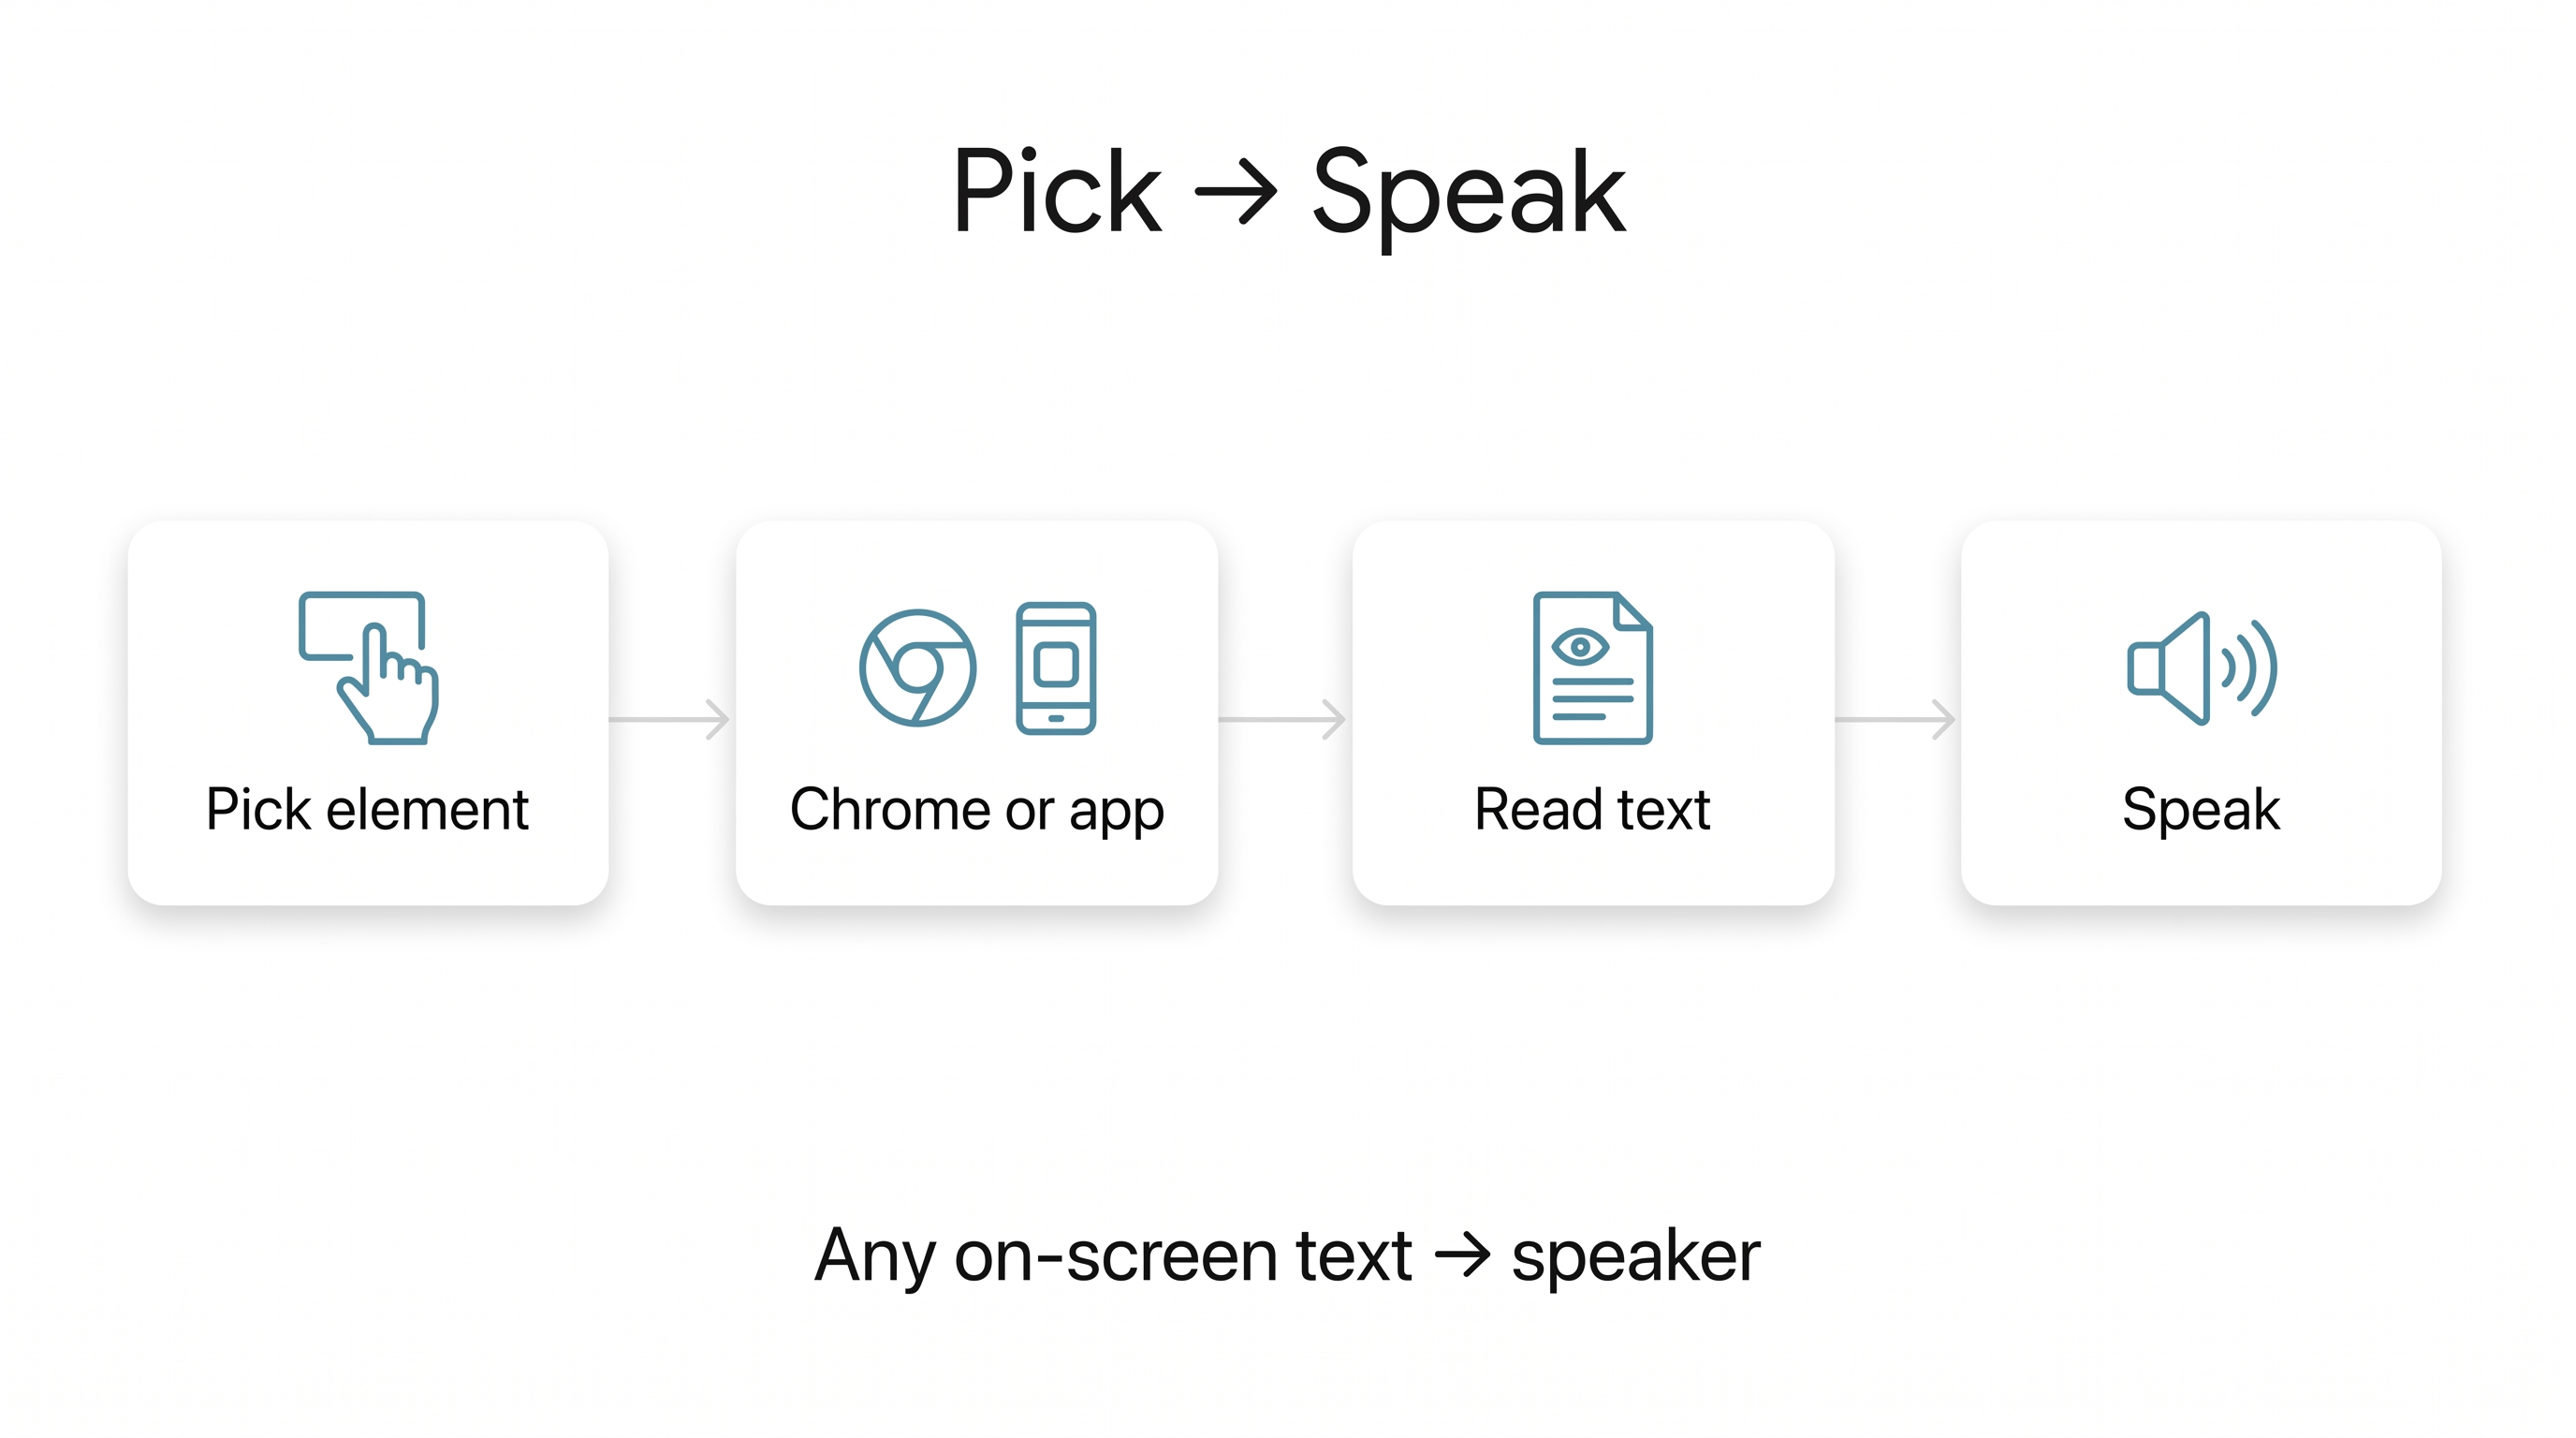
Point the interactive picker at text in Chrome or another application. XBlox
resolves the selected UI element, reads its text, and sends that text to the
speaker. It turns otherwise inaccessible on-screen copy into a small,
hands-free reading tool.
tanit-cli xblox run --src dist/shared/xblox/inspect-text-speak.xblox
Source: dist/shared/xblox/inspect-text-speak.xblox
HQ screen recording
Record a full display or enable the picker to capture a window or selected
region. The native fast capture path produces H.264 MP4 and can include desktop
audio and the cursor.
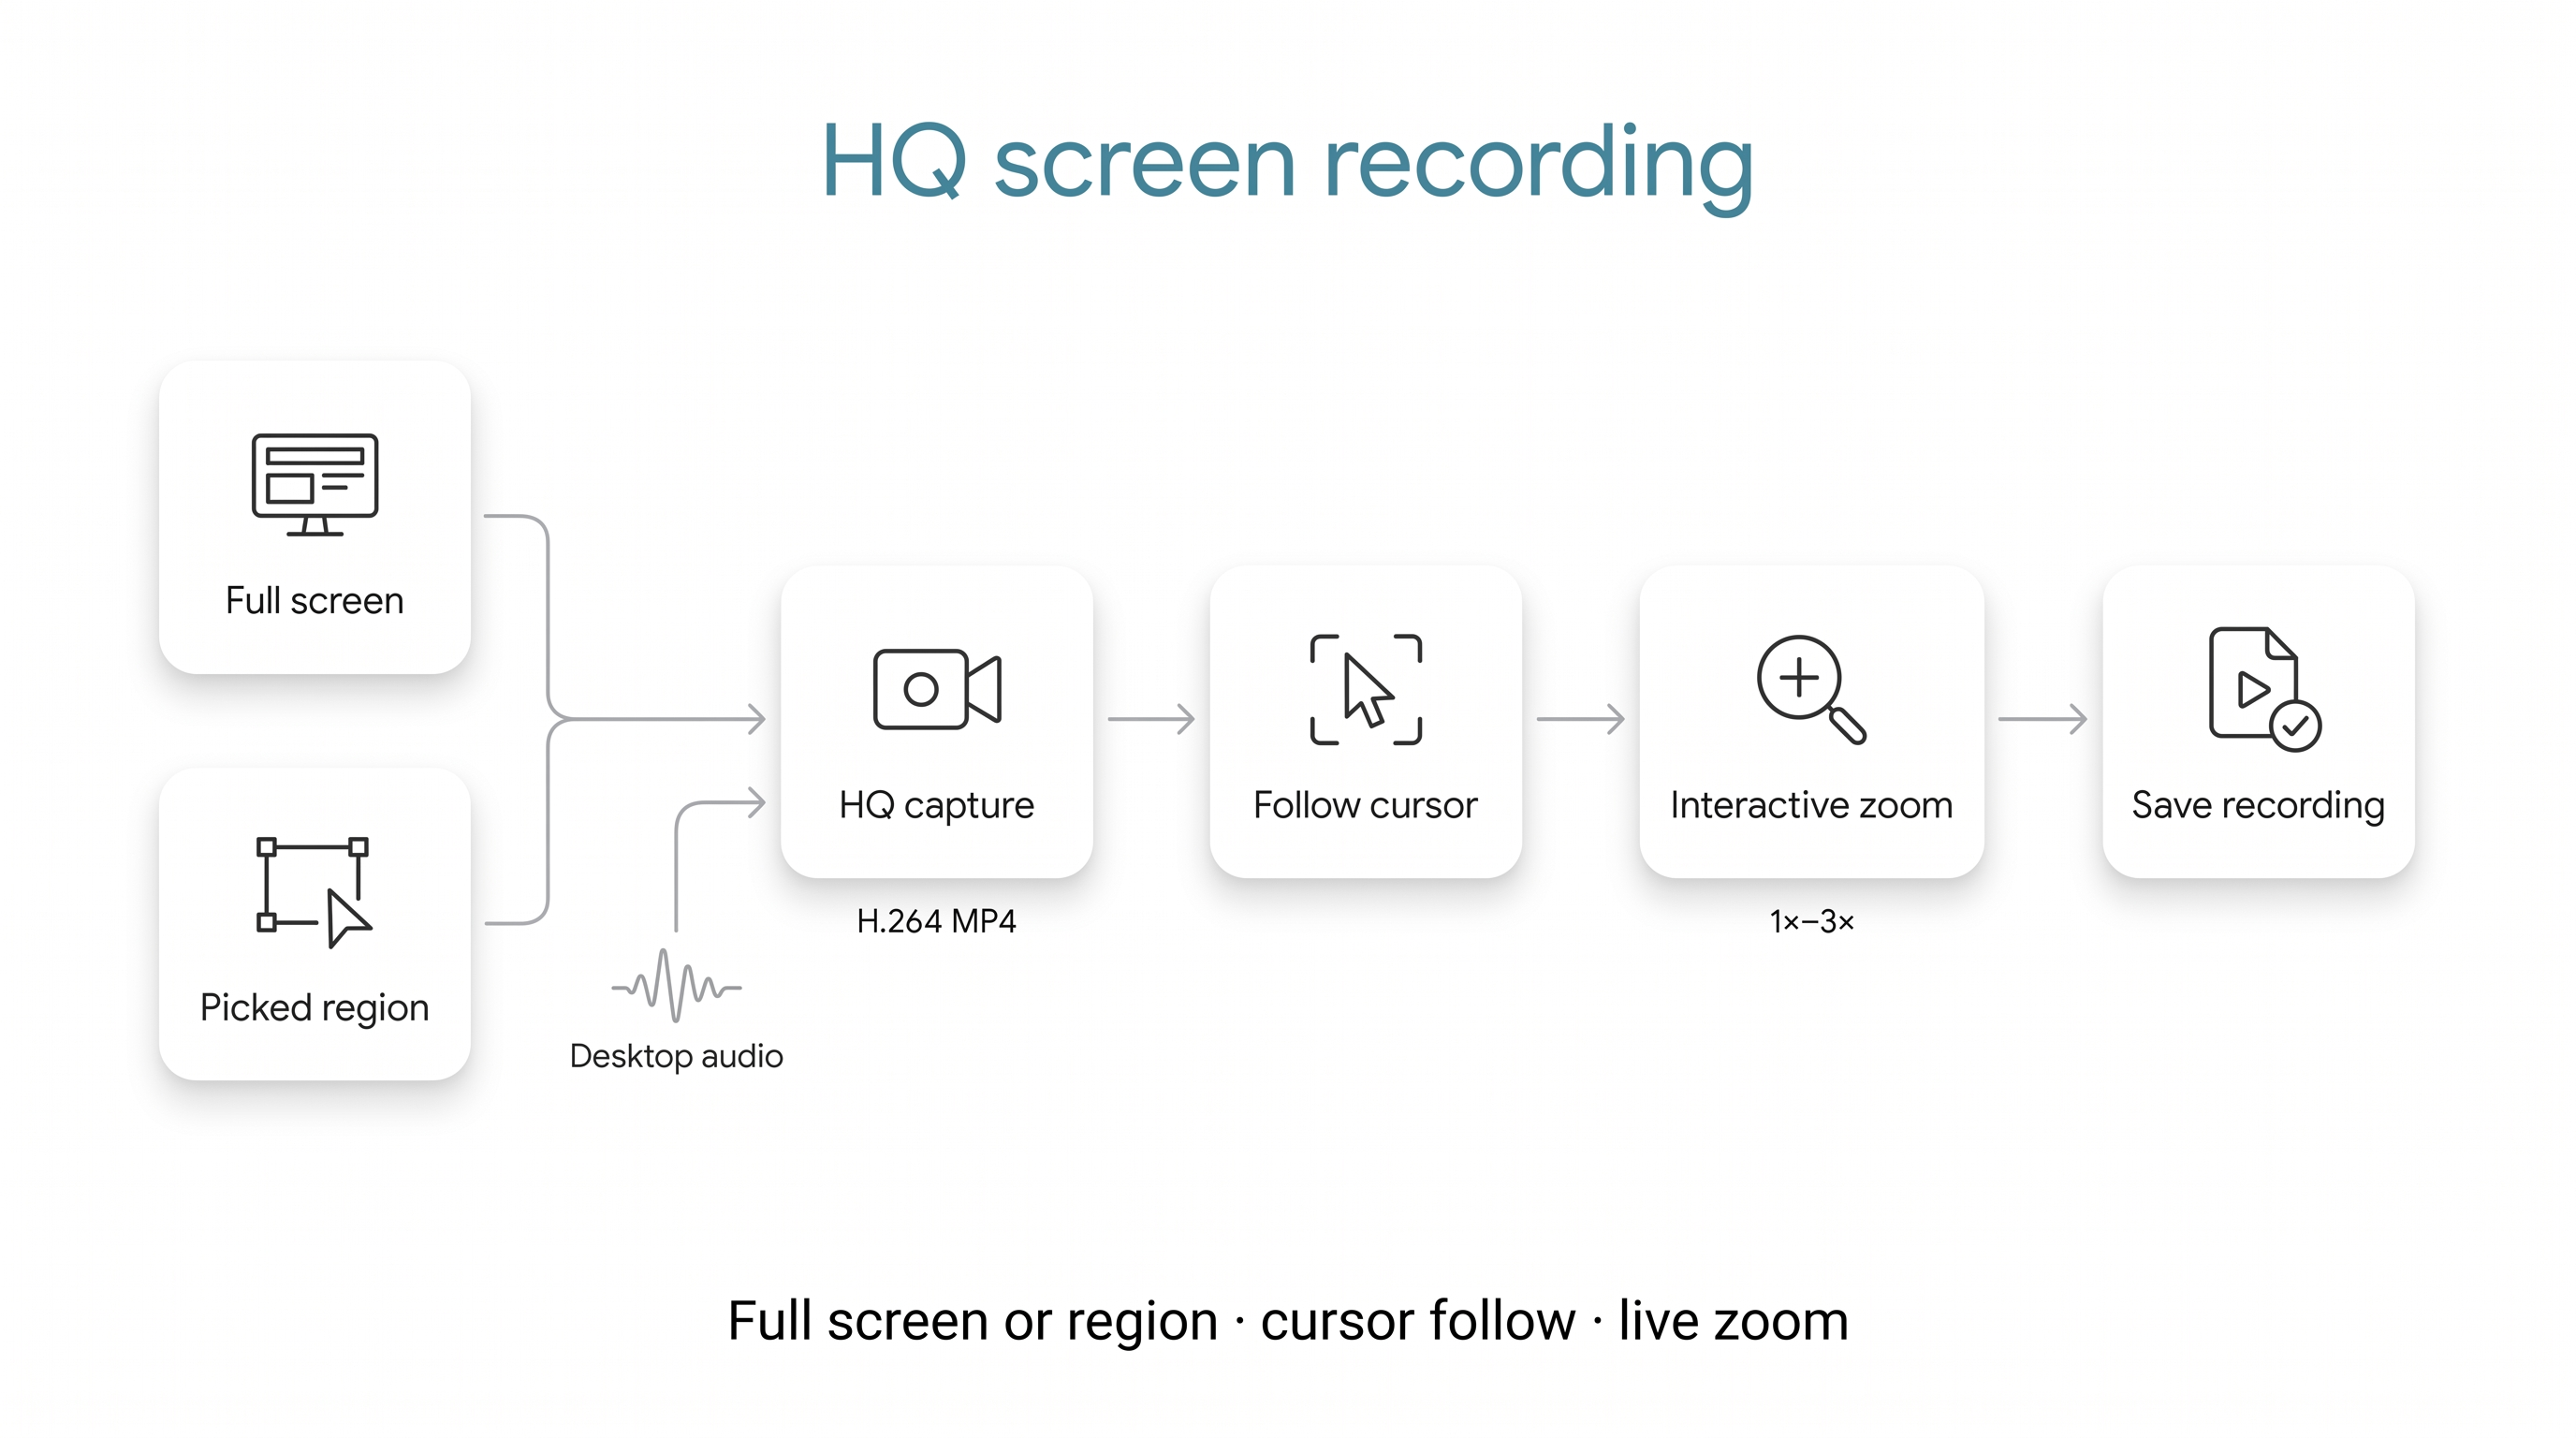
The shipped example is configured for a 1080 × 1080 canvas at 24 fps and
18 Mbps. It follows the cursor with a smooth viewport transition and accepts
interactive zoom from 1× to 3× while recording. Change the aspect ratio,
resolution, frame rate, bitrate, audio source, or output path directly in thevideoCapture block.
On supported Windows builds, the fast WGC capture engine enables cursor follow,
picked-region capture, bitrate control, and live zoom without a second
post-processing pass.
tanit-cli xblox run --src dist/shared/xblox/video-recorder.xblox
Source: dist/shared/xblox/video-recorder.xblox
Automate a desktop application
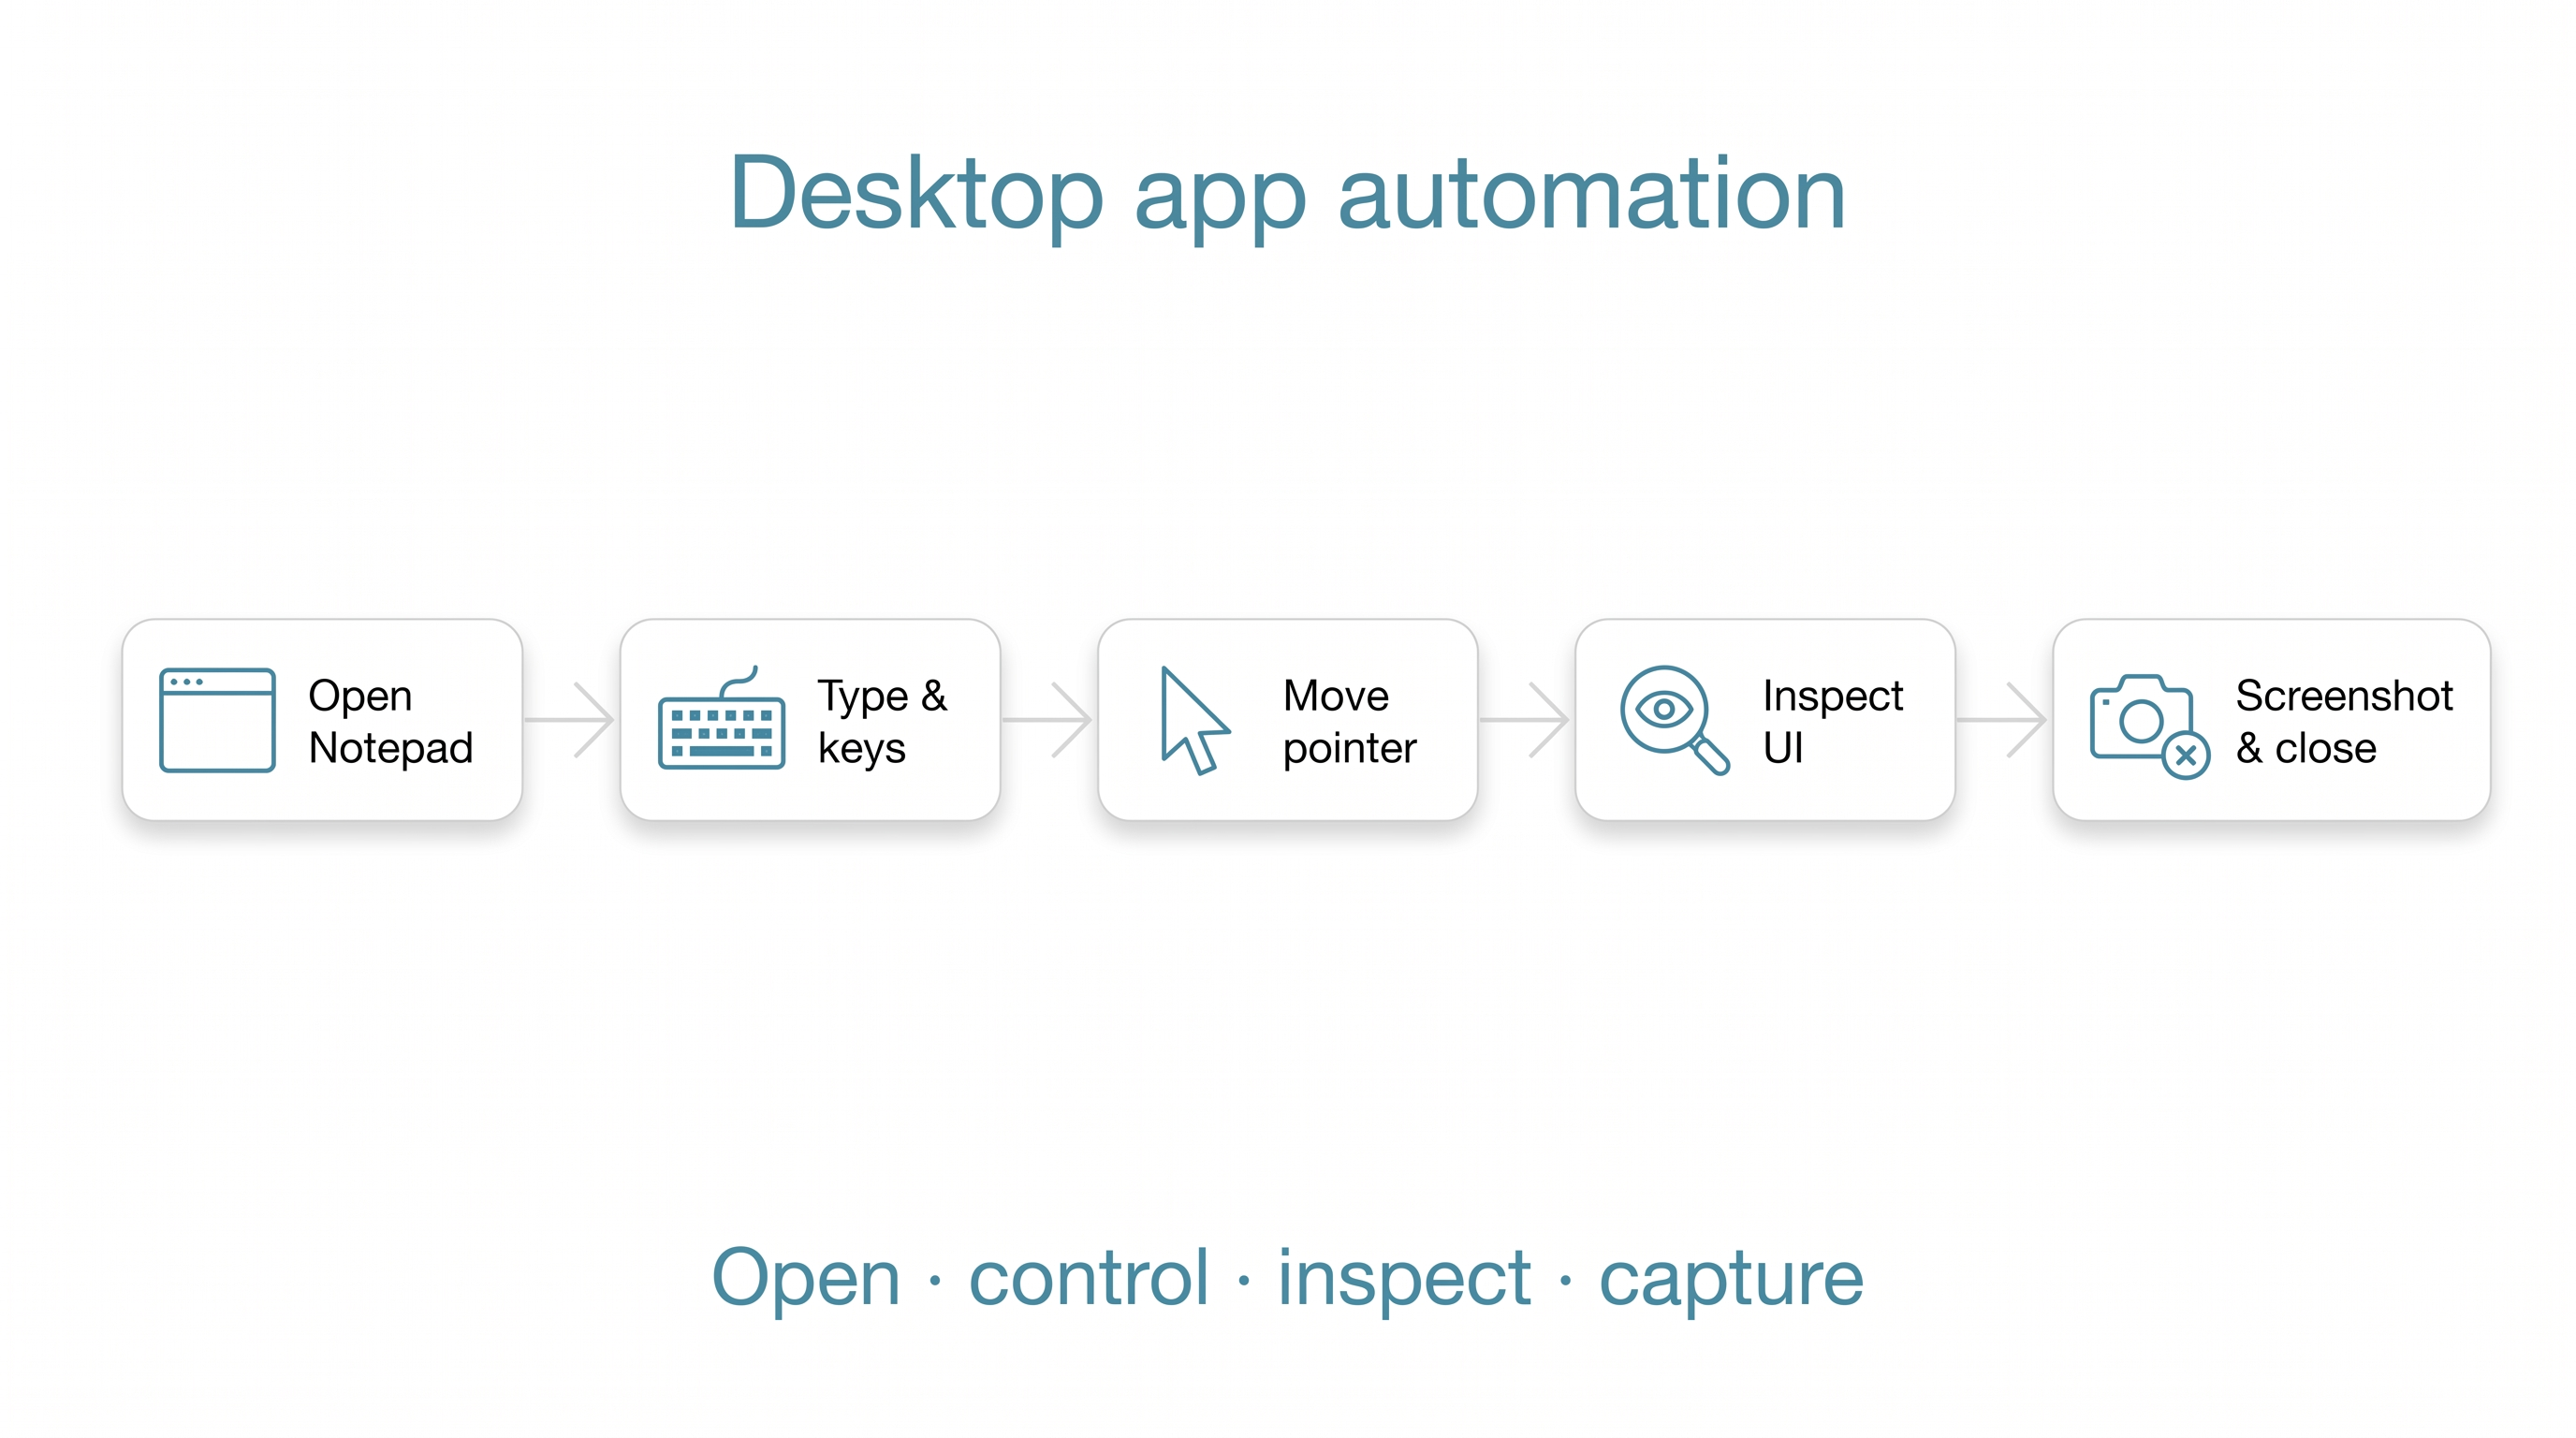
XBlox can control native applications without handing the entire task to an
agent. This Windows example opens Notepad, activates its window, types and
sends keys as one batch, moves the pointer using window-relative coordinates,
finds the editor through UI Automation, captures a screenshot, and closes the
demo window.
tanit-cli xblox run --no-wait --src tests/xblox/computer-use-notepad.xblox
The fixture is Windows-only and force-closes its temporary Notepad window.
Source: tests/xblox/computer-use-notepad.xblox
Search Office files locally
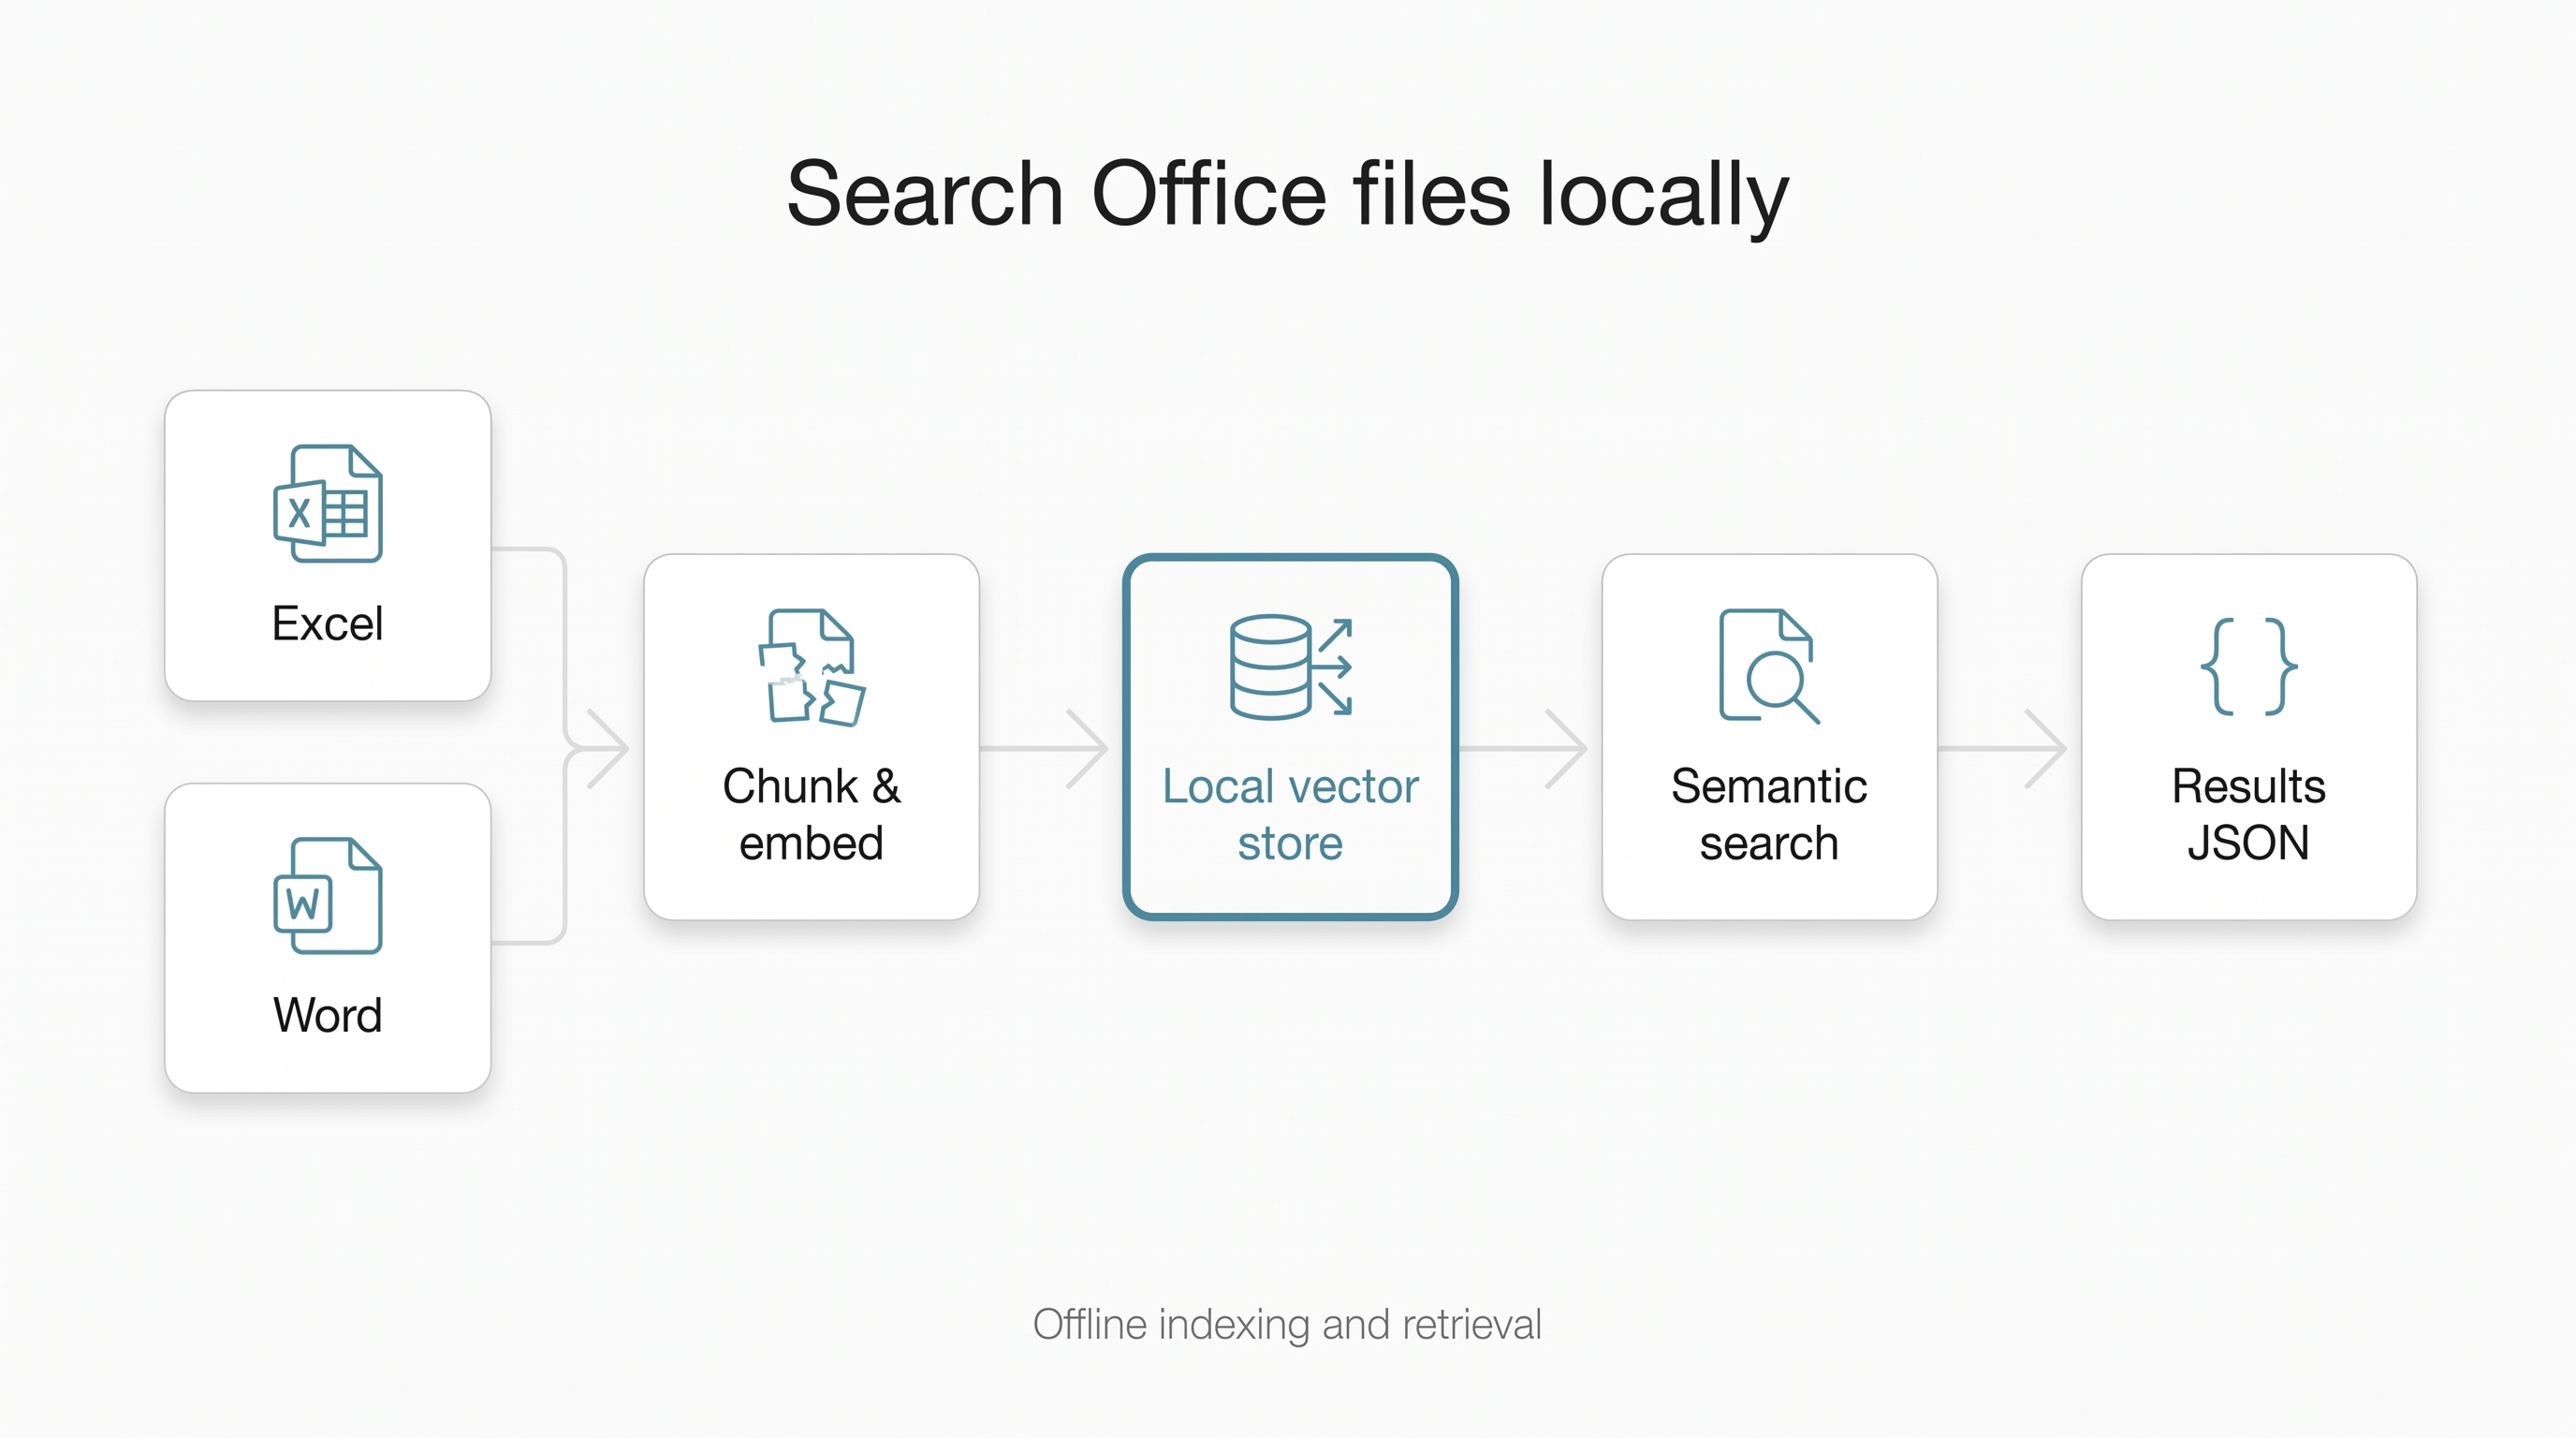
Build a small local retrieval index from Word and Excel files. The example
chunks an annual report and meeting notes, embeds them into a local vector
store, runs semantic searches for financial results and action items, and
writes the ranked results as JSON.
tanit-cli xblox run --src tests/xblox/vector-store-office.xblox
It uses the Office fixtures under tests/office/ and writes its store and
results under out/. A compatible local embedding model must be available.
Source: tests/xblox/vector-store-office.xblox
Read and write Modbus
XBlox includes both Modbus TCP client and server blocks. The paired example
starts a local server with holding registers, input registers, coils, and
discrete inputs. A client connects, reads the initial values, performs single
and multi-value writes, verifies the result, and closes the connection.
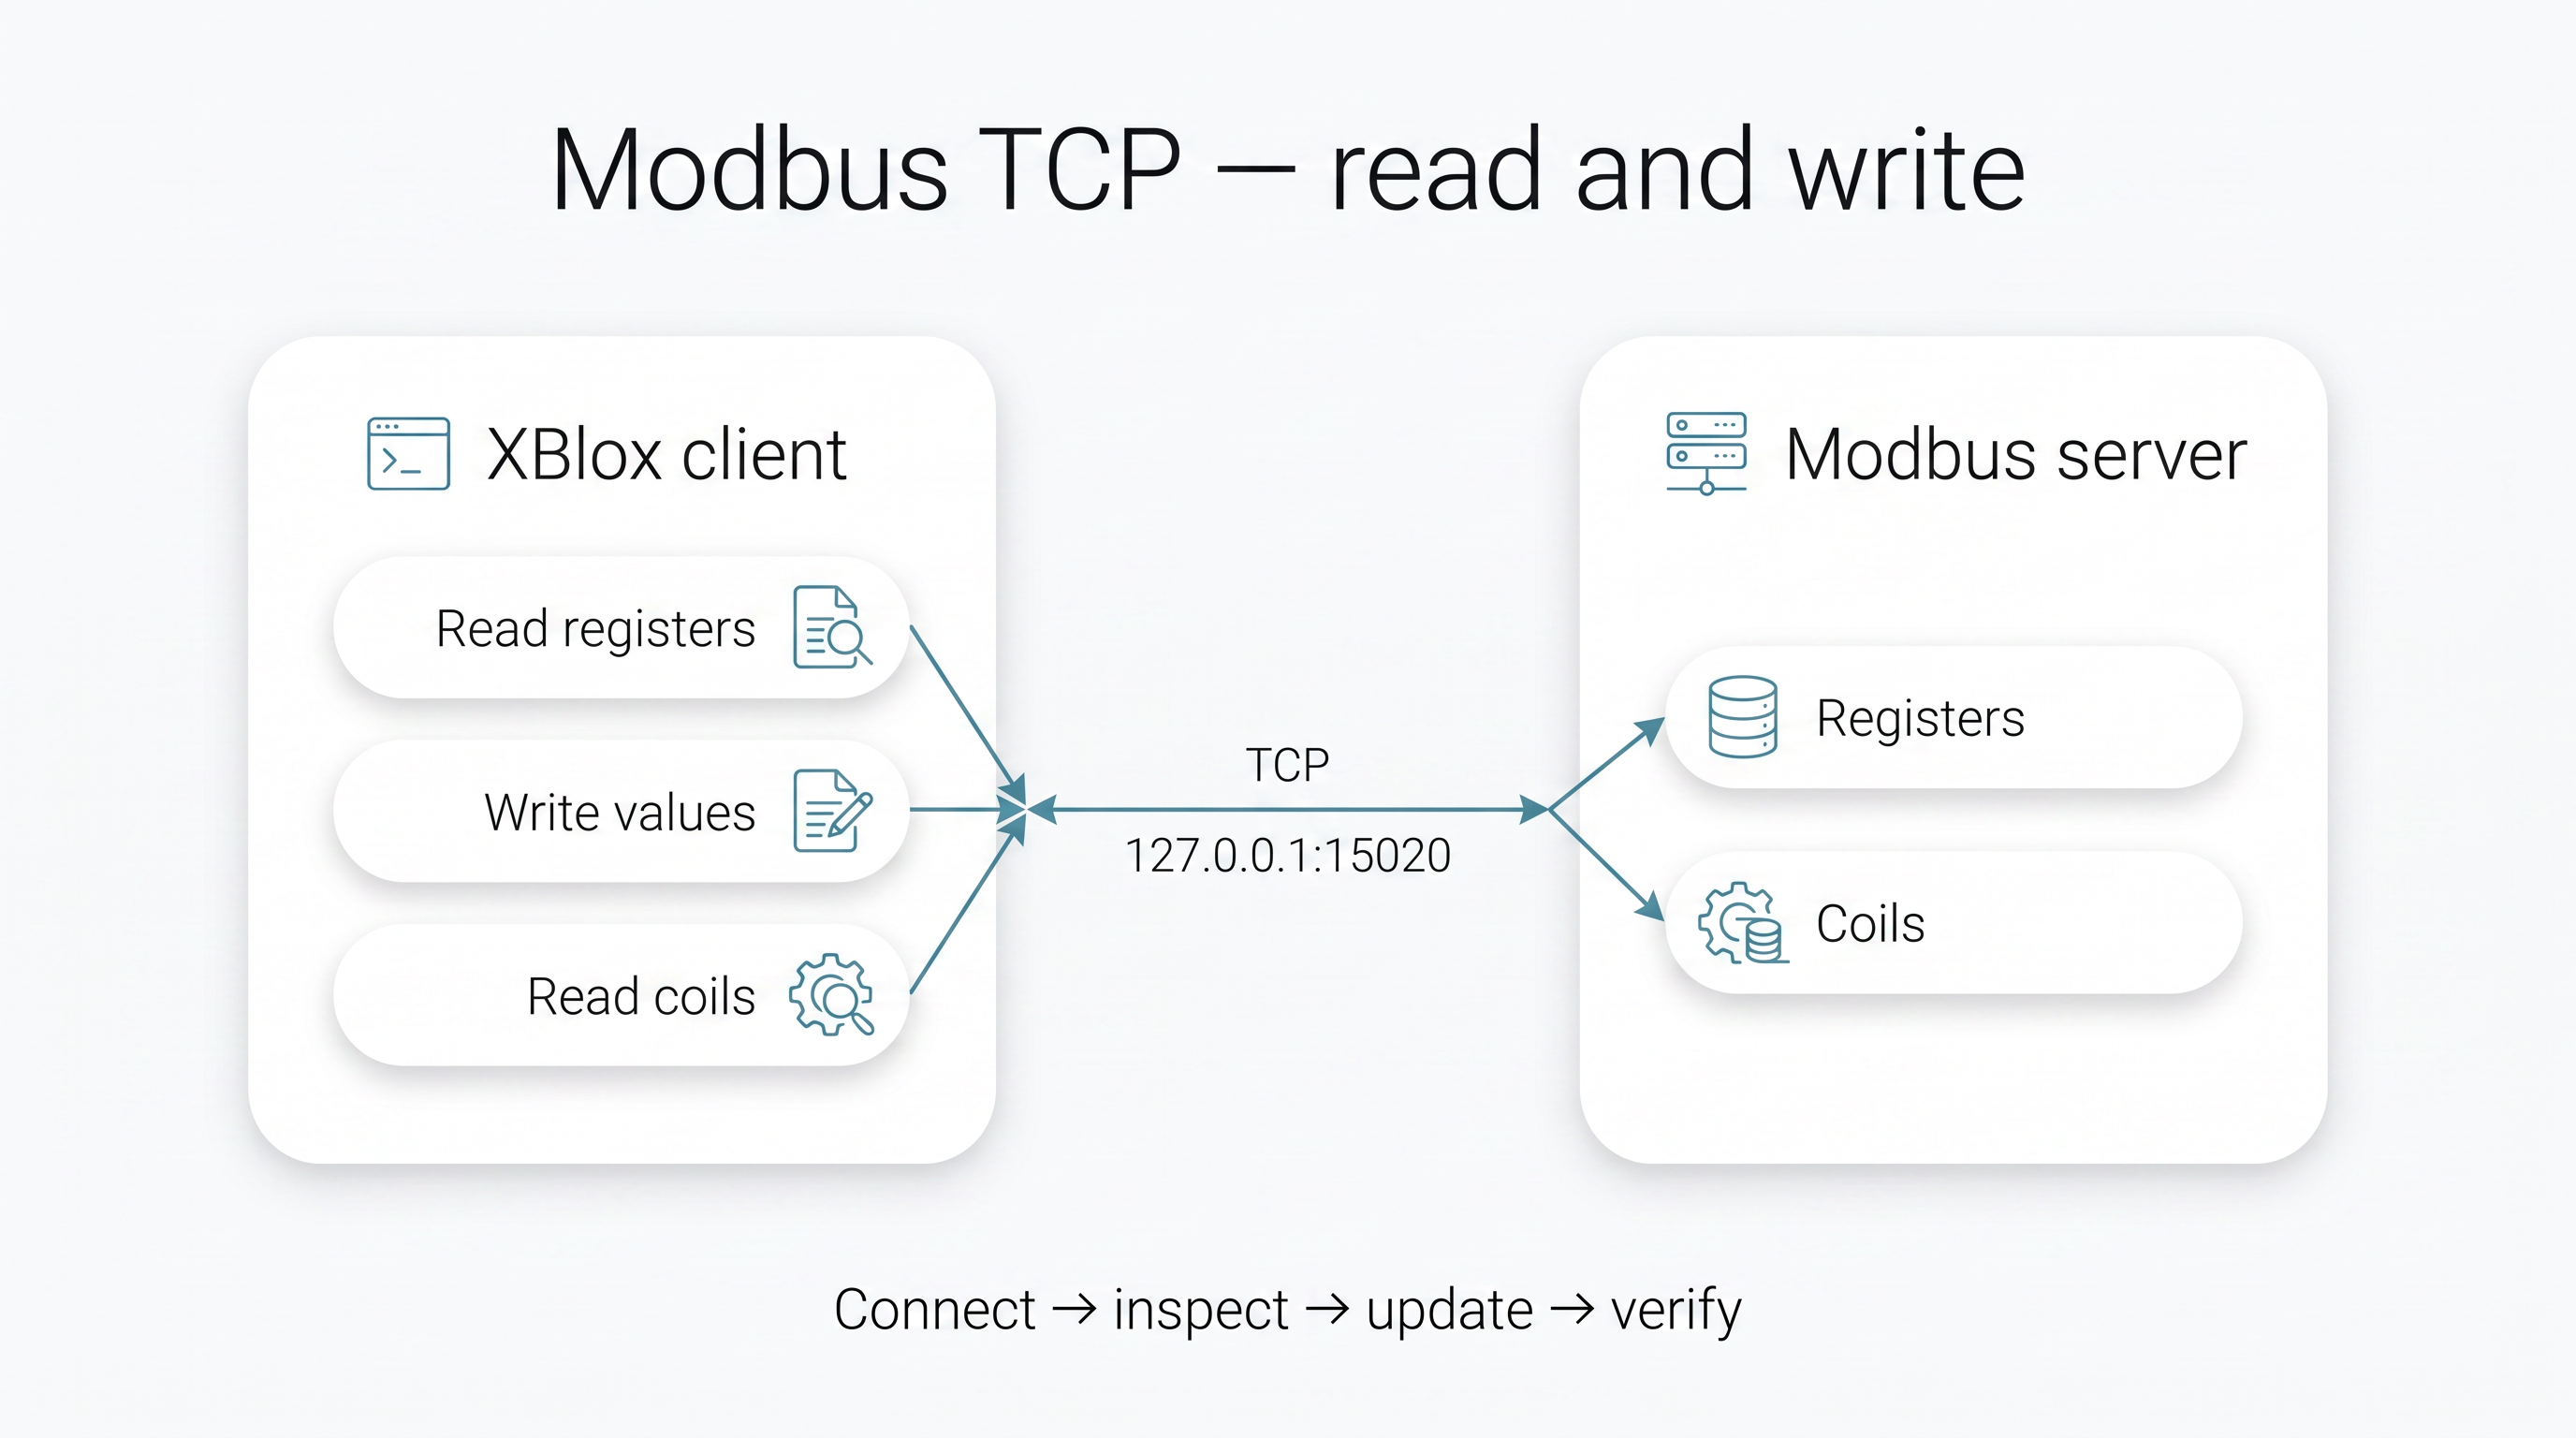
Run the server first, then the client in a second terminal:
tanit-cli xblox run --no-wait --src tests/xblox/modbus-server.xblox
tanit-cli xblox run --src tests/xblox/modbus-client.xblox
The fixture uses tcp:127.0.0.1:15020 and synthetic values, so it is safe to
explore without connecting to production equipment.
Sources: tests/xblox/modbus-server.xblox,tests/xblox/modbus-client.xblox
Detect objects and record the result
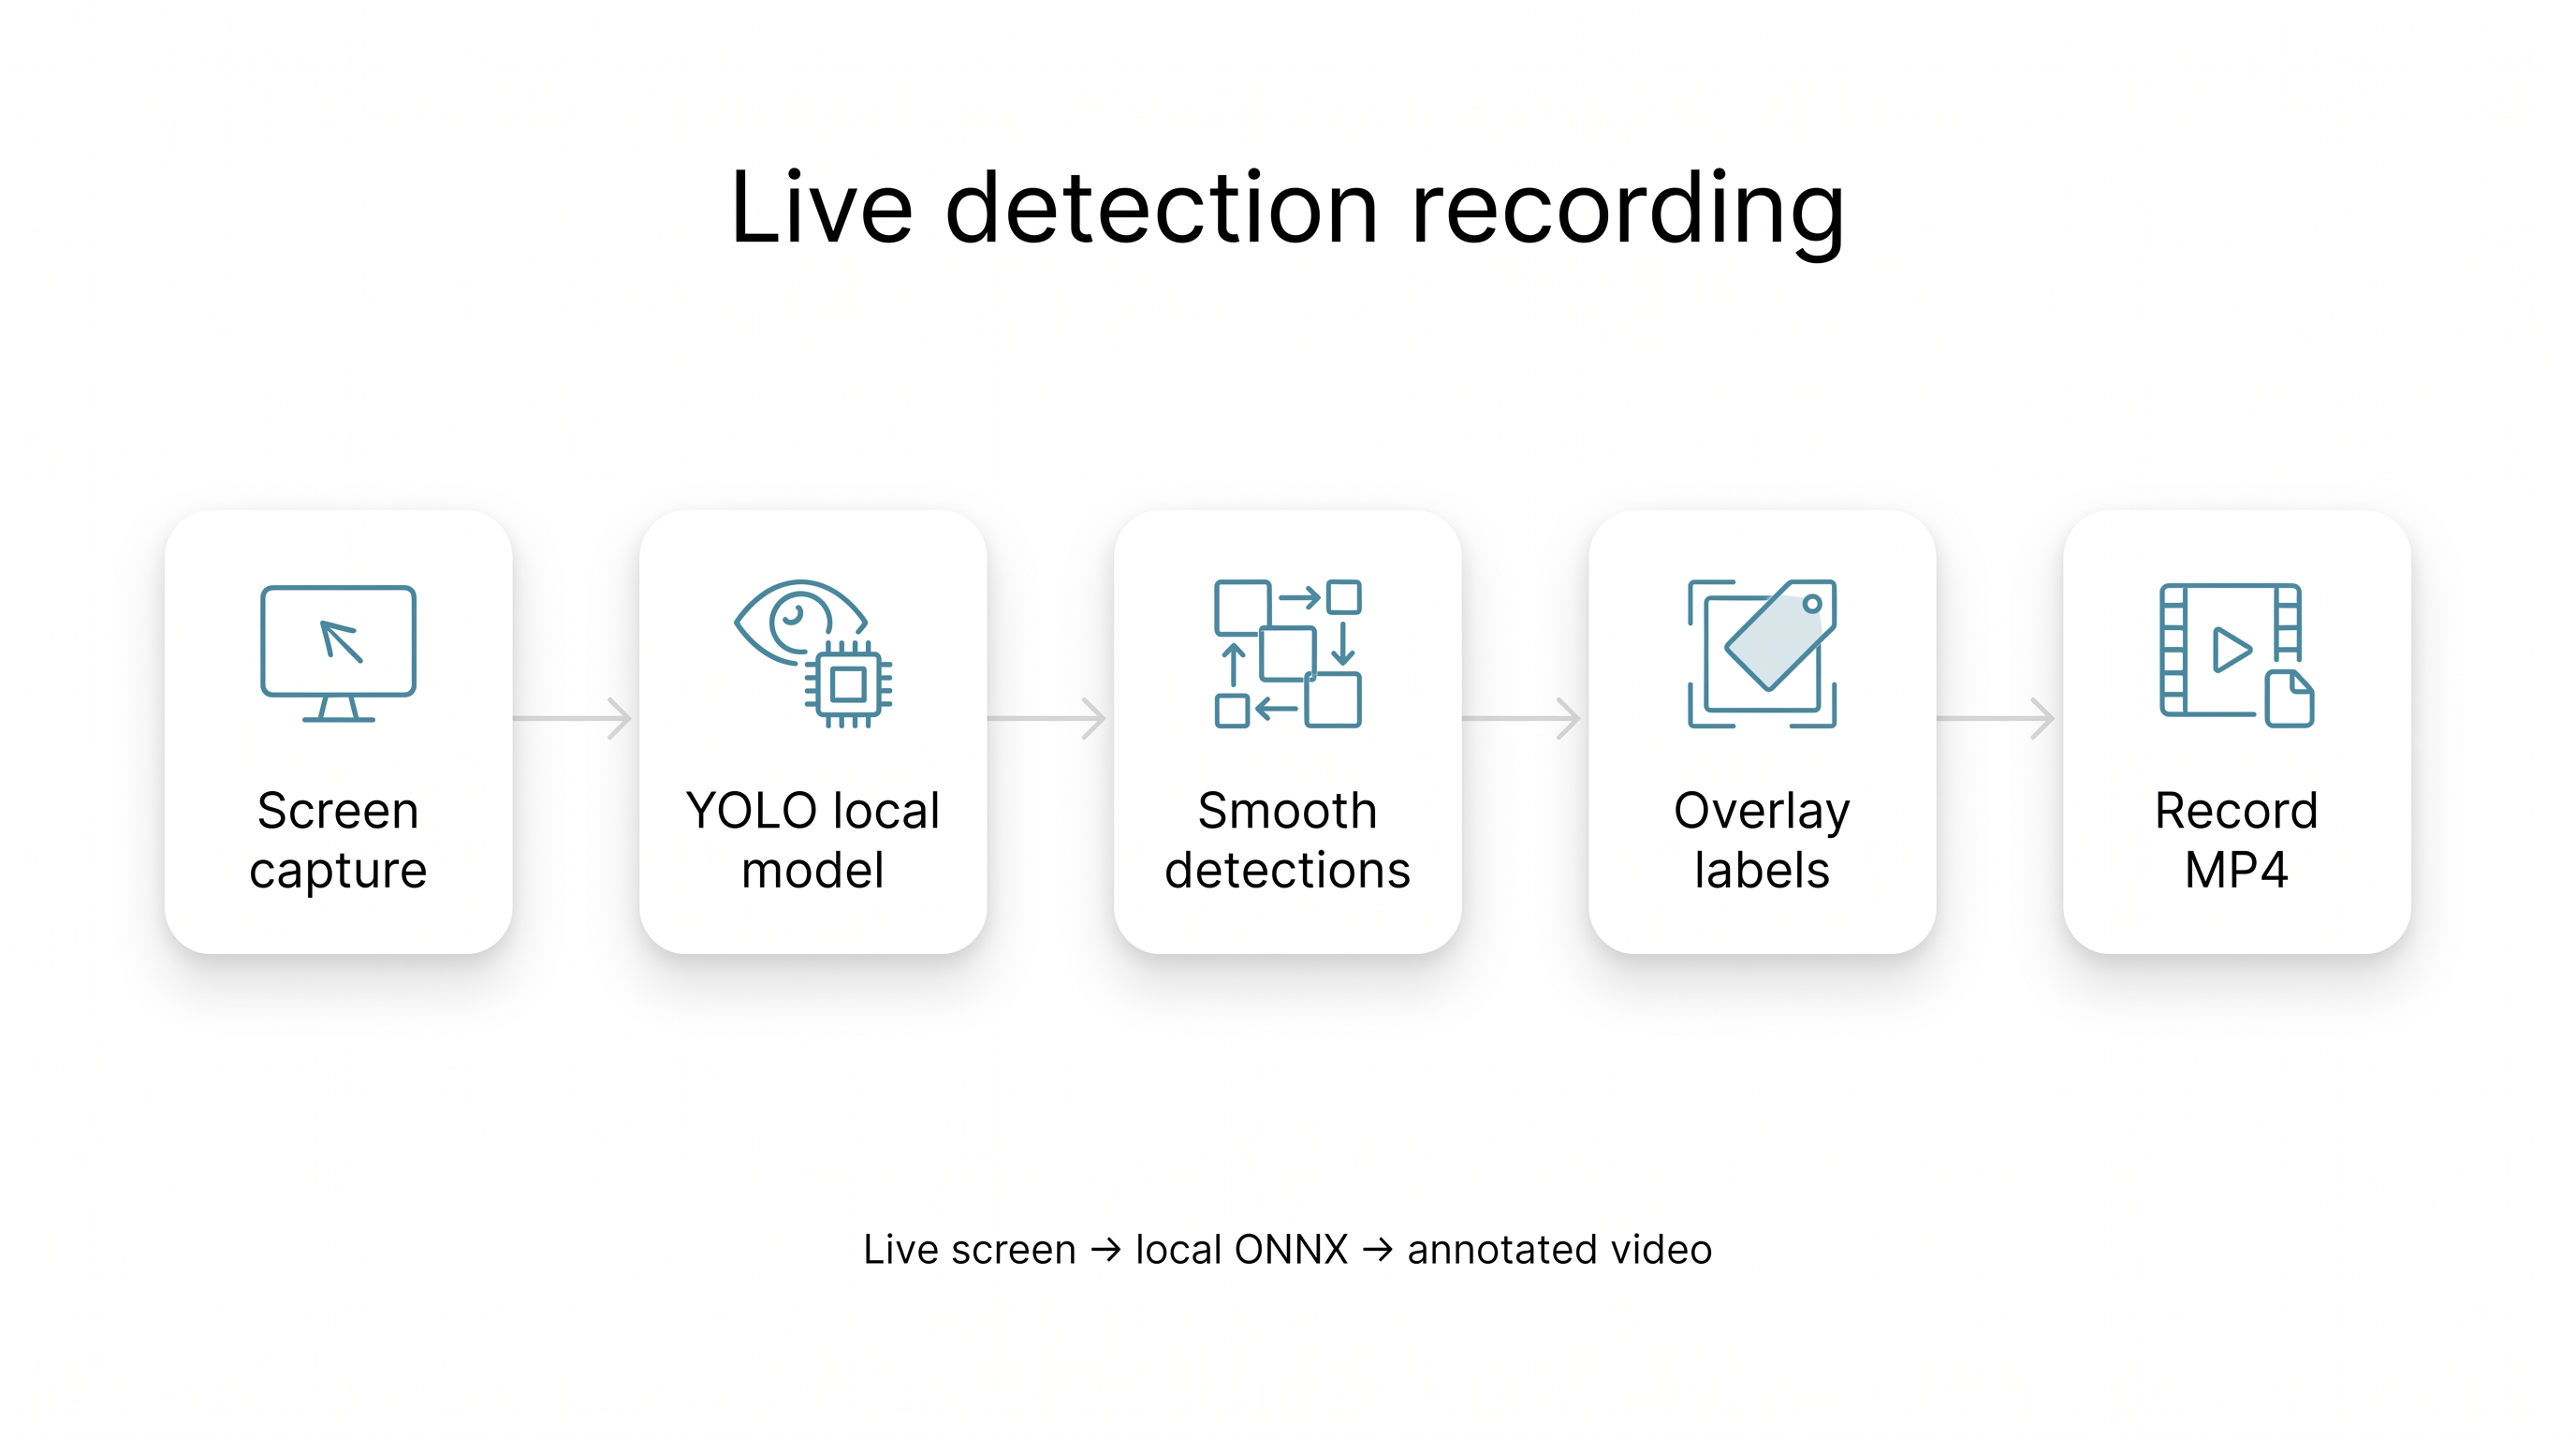
Combine live capture and local inference in one block. This example samples
the primary screen, runs YOLO object detection through a local ONNX model,
smooths detections between frames, draws labels and statistics, and records
the annotated result as MP4.
tanit-cli xblox run --src tests/xblox/video-detect-record.xblox
The flow runs at 10 fps until stopped and expectsdist/models/yolo11n.onnx beneath ${ENV}. GPU acceleration is
helpful but the model and available providers determine the actual runtime.
Source: tests/xblox/video-detect-record.xblox
Call an MCP tool inside a flow
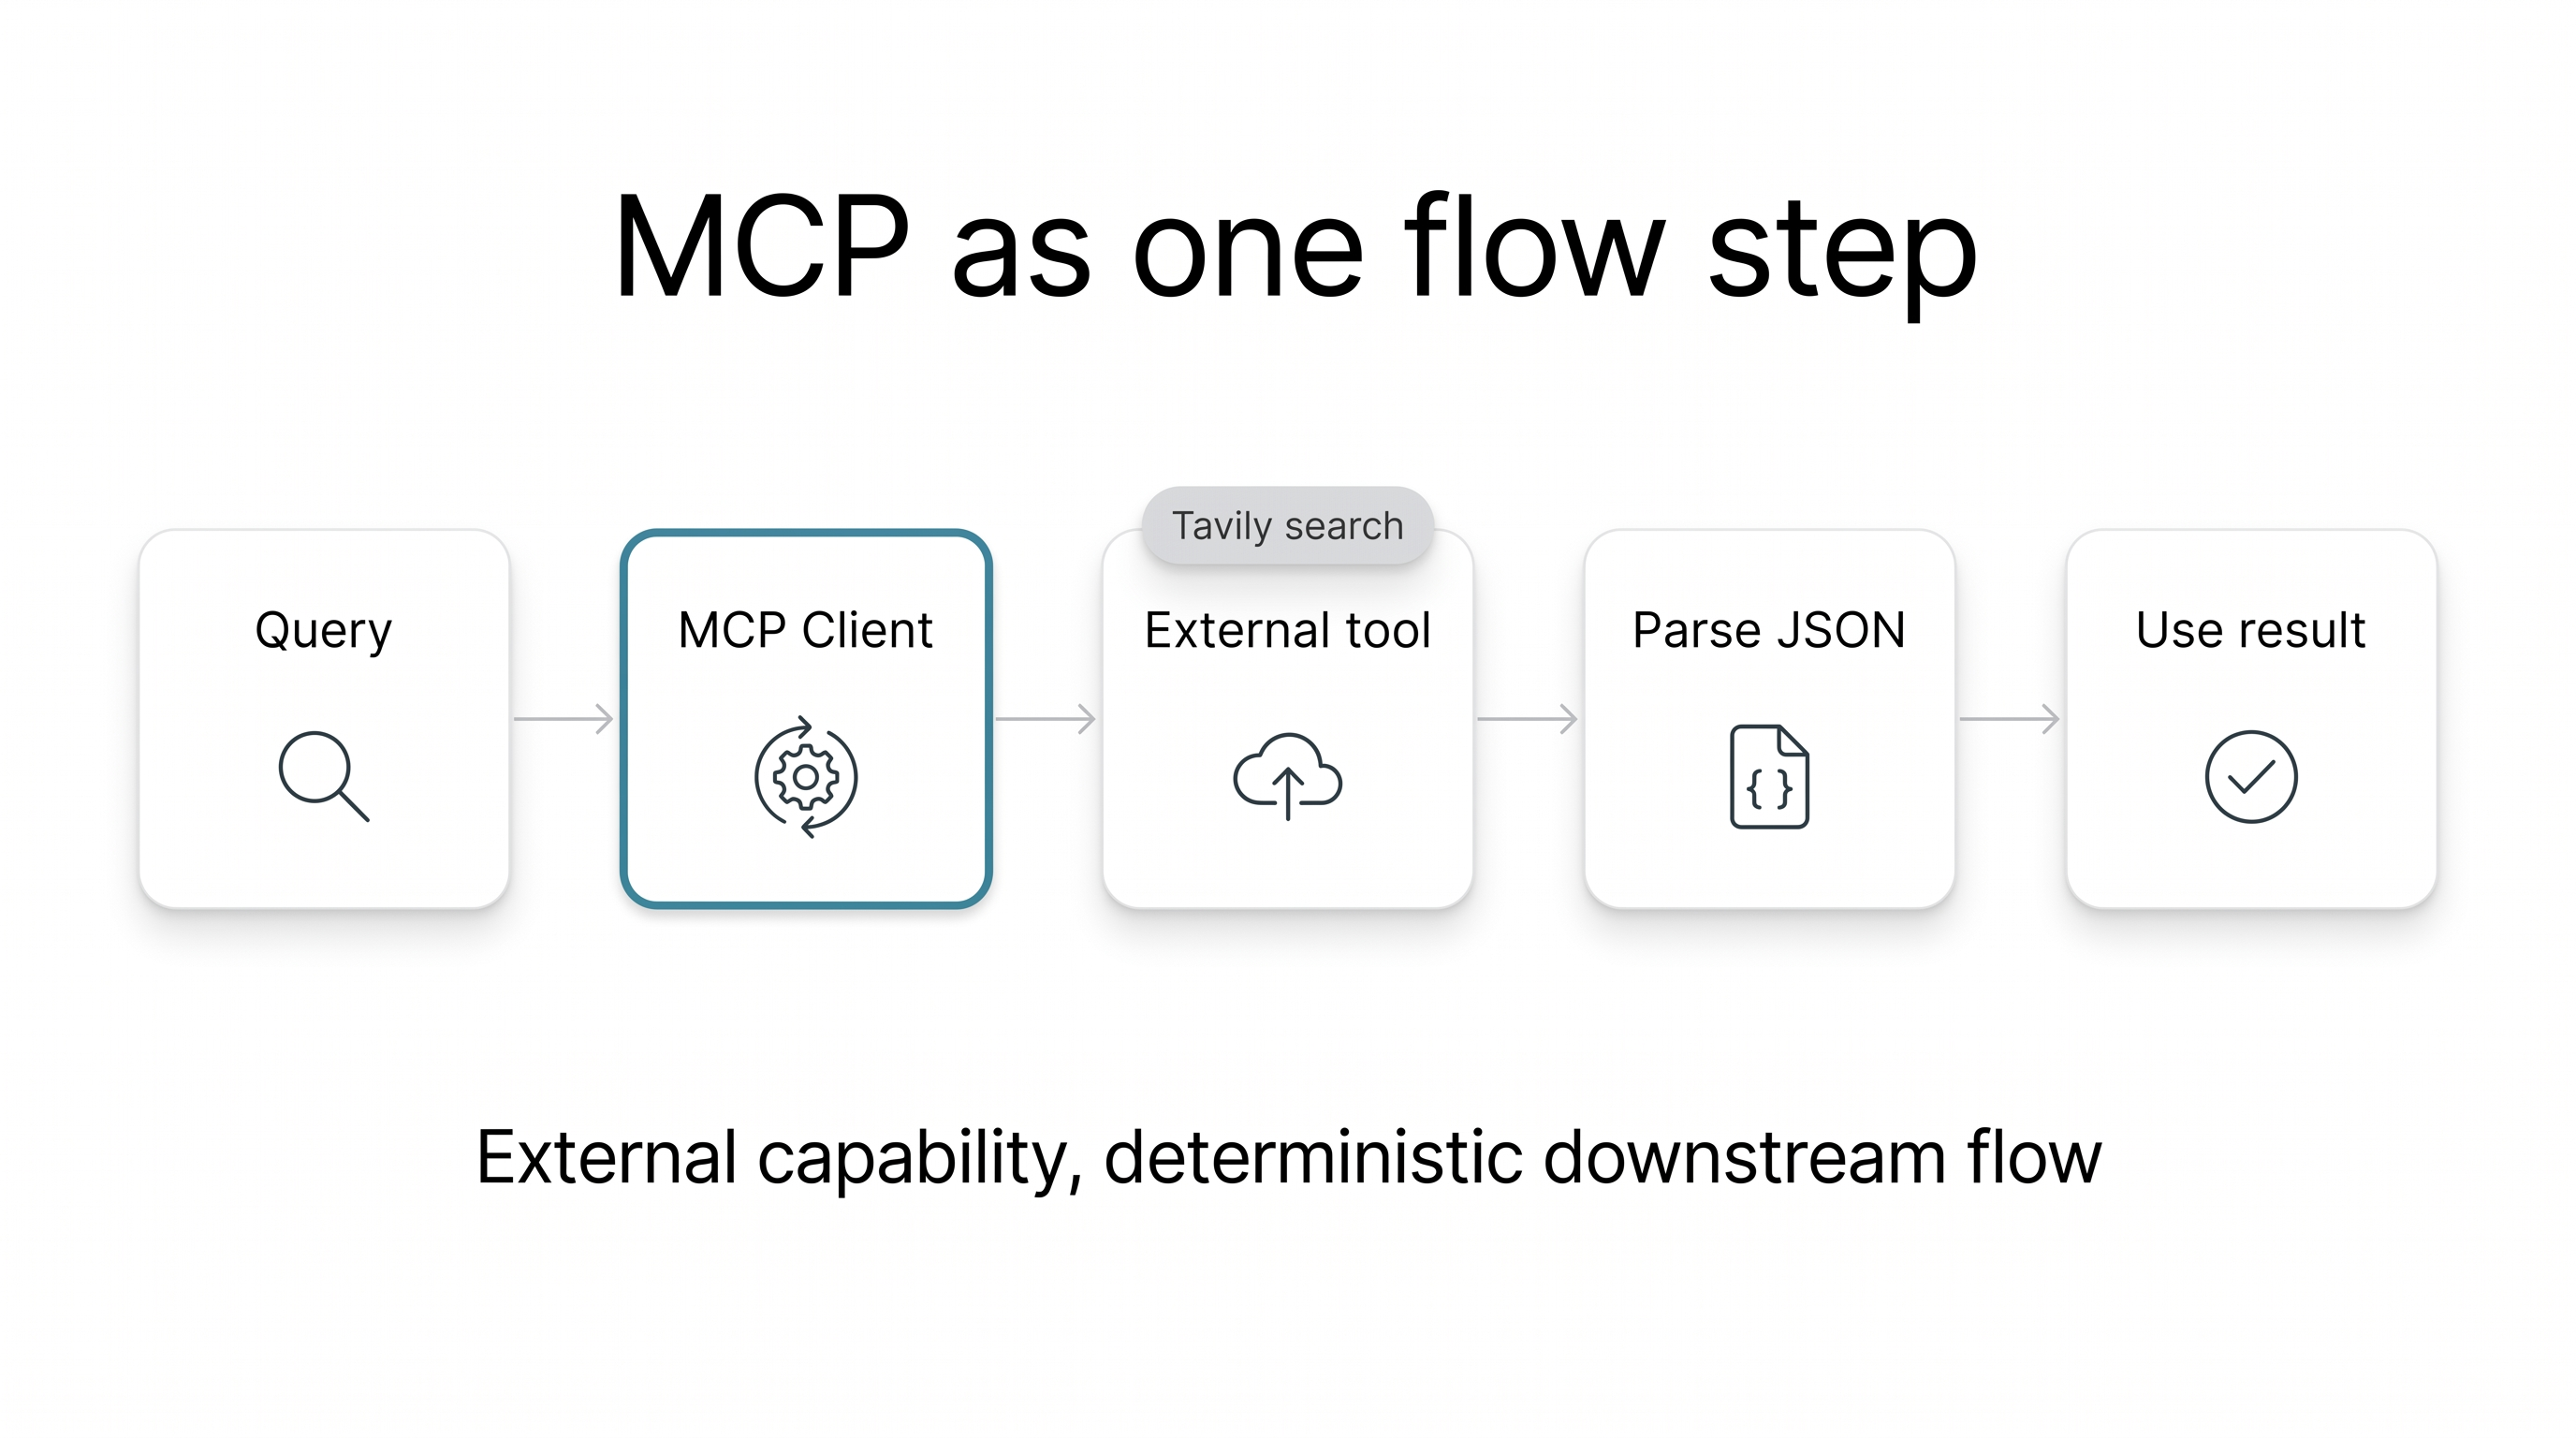
MCP can be one explicit step inside an otherwise deterministic automation.
The live fixture calls an external Tavily search tool through an MCP client,
parses the returned JSON with jq, extracts the item count and sample, and
passes the structured result to the remaining blocks.
tanit-cli xblox run --src tests/xblox/network-mcp-live.xblox
This fixture requires an external stdio MCP server exposingtavily-tavily_search and the corresponding search credentials. Replace its
server configuration and tool name with any MCP capability available in your
environment.
Source: tests/xblox/network-mcp-live.xblox
The block palette
The palette covers the complete path from input to output:
| Category | What it covers |
|---|---|
| Flow / Context / Data | Groups, loops, conditions, variables, parse and shape values |
| Input / Picker | Interactive window, screen, and element pickers; path and device pickers on params |
| Files / Shell | Local paths, copy/move, process and command steps |
| Network | HTTP and SSH for fetch, push, and remote hops |
| MQTT / Modbus | Brokers and industrial registers — light shop-floor and IoT peeks |
| Bluetooth | Devices, pair/connect, audio endpoints |
| Audio | Device list, play, mic/desktop/mix record (WAV / AAC), STT / TTS |
| Video | Cameras, screens, windows; stills and HQ H.264 MP4 record (WGC fast path, zoom/follow, optional AAC mux) |
| Image / OCR / Vision | Transform, OCR, local vision models when enabled |
| App / Browser | Activate, click, type, screenshot, inspect; browser batch steps |
| AI / Service / Vector | LLM agent steps, CMS/service calls, embeddings — optional, not required for simple I/O |
Exact blocks and I/O depend on the installed edition and organization policy.
The XBlox Documentation lists every available block and
parameter.
Deterministic first, AI when useful
XBlox lets you build the automation yourself and keep every step visible and
editable. HTTP, file operations, Modbus, recording, parsing, and application
control remain deterministic.
When a flow benefits from interpretation, use an AI or MCP block for that one
step. Tanit supports more than 100 models across dozens of providers, including
local models and custom endpoints. Consent, scopes, and policy remain around
the flow, so changing a model does not mean rebuilding the automation.
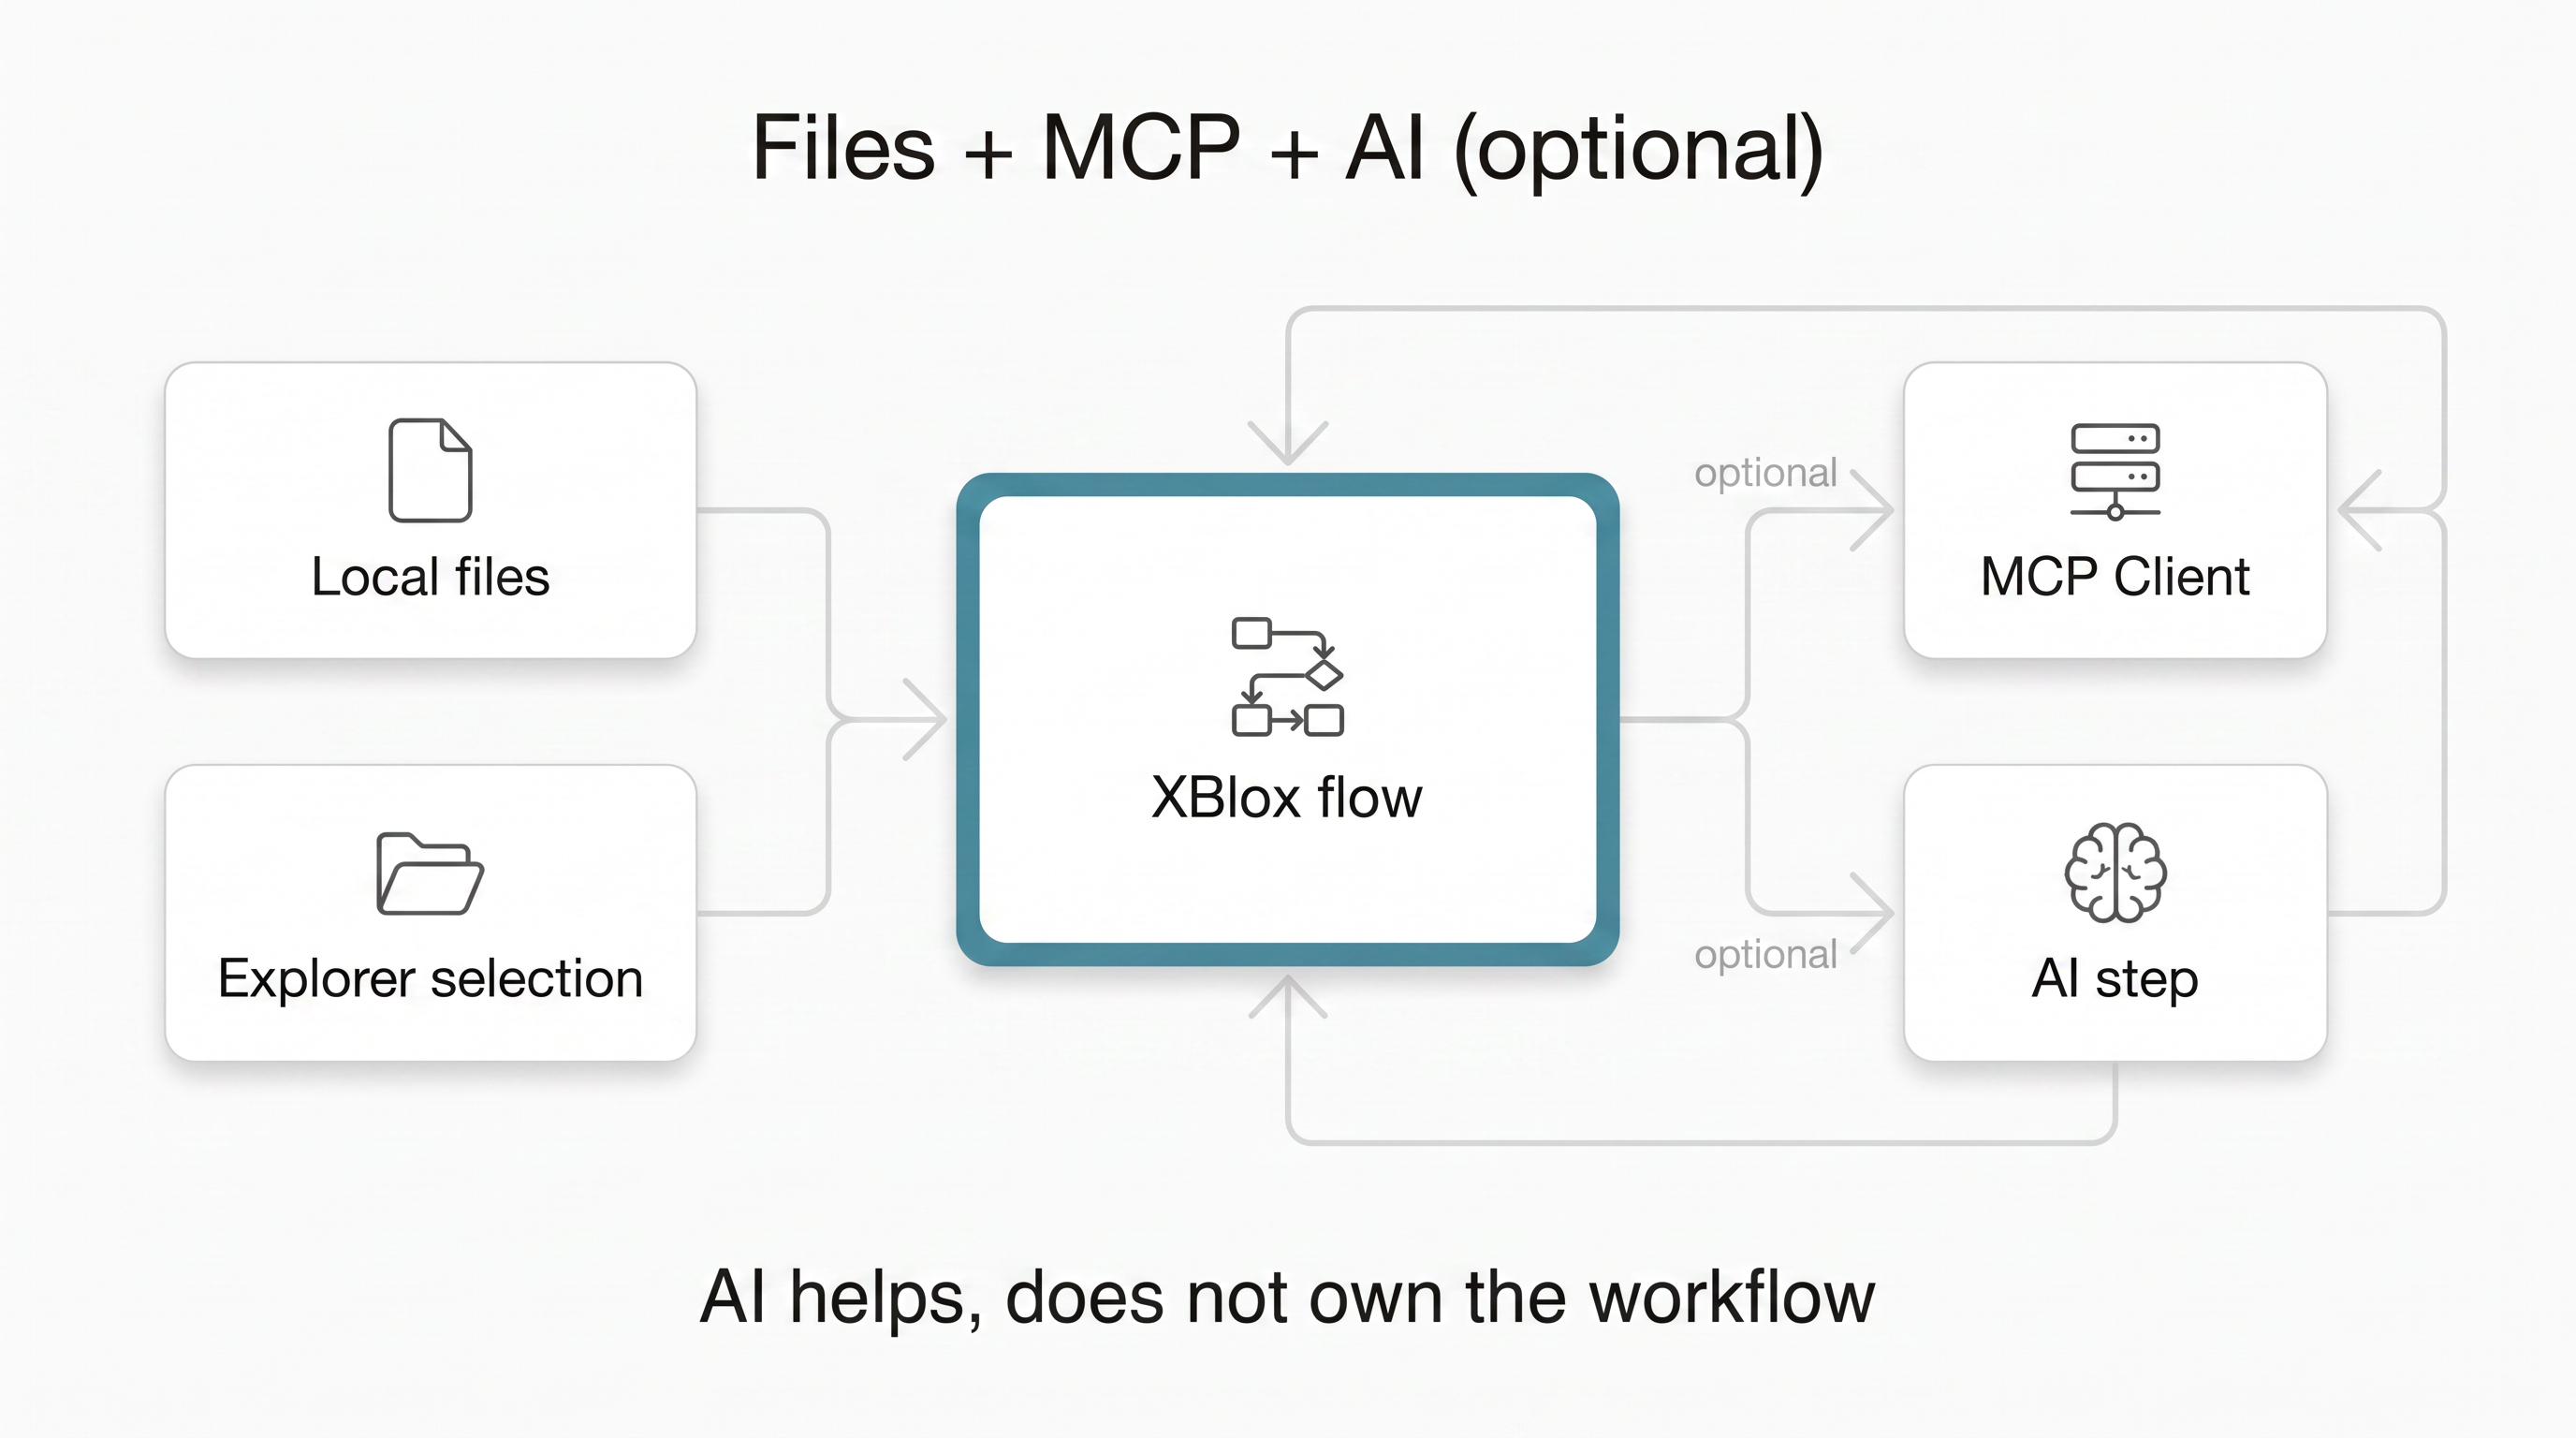
Files and deterministic blocks form the workflow; MCP and AI extend it when
needed.
Start with an existing flow
Open one of the examples above in the visual editor, change a block, and save
it under a new name. Run it directly, embed it in Markdown, or expose it as a
command or MCP tool once it does the job you need.
- XBlox block and CLI reference
- Tanit Viewer — files, Markdown, and live XBlox blocks
Keyboard shortcuts
Reference for keyboard shortcuts in the XBlox builder (apps/xblox). Shortcuts use Ctrl on Windows/Linux and Cmd (⌘) on macOS unless noted.
Shortcuts are ignored while typing in a text field, search box, property editor, or other input. Some overlays (block properties, insert palette, context menu) also suspend global shortcuts until they are closed.
View modes (center preview)
These work from anywhere in the builder except while an overlay has focus (see above). The numbered shortcuts match the left-to-right order of the view mode buttons in the toolbar; hidden modes are skipped, so Alt+1 is always the first visible mode, Alt+2 the second, and so on.
| Shortcut | Action |
|---|---|
| Alt+1 … Alt+9 | Jump to the Nth visible center view mode |
Typical full build order when all panels are enabled:
| # | Mode |
|---|---|
| 1 | Block list (tree) |
| 2 | Variables |
| 3 | Run log (preview) |
| 4 | Wiring |
| 5 | Flow diagram |
| 6 | Sequence diagram |
Hover a view mode button to see its label and Alt+N hint.
View panel toggles (toolbar)
Toggle the side/bottom dock panels (View toggles group in the toolbar). Same shortcuts as the button tooltips.
| Shortcut | Panel |
|---|---|
| Alt+← | Block palette (left) |
| Alt+↓ | Run log panel (bottom) |
| Alt+→ | Properties panel (right) |
Each shortcut shows or hides the matching panel. Unavailable panels are skipped (embedded builds may hide palette, log, or properties).
Insert block palette
Works in block list and wiring views (and any other center view that uses the shared builder insert menu).
| Shortcut | Action |
|---|---|
| +, =, or Numpad + | Open insert palette — insert after the selected block, or append at end if nothing is selected |
| Numpad − | Open insert palette — insert before the selected block, or before the first block if nothing is selected |
In wiring view you can also click a + arm between blocks to open the same palette at that gap.
Inside the insert palette
| Shortcut | Action |
|---|---|
| Type | Filter blocks by name |
| ↑ / ↓ | Move highlight |
| Home / End | First / last item |
| Enter | Insert highlighted block |
| Esc | Close without inserting |
Block list (tree view)
Click the block tree (or tab to it) so it has focus, then use:
Selection & navigation
| Shortcut | Action |
|---|---|
| ↑ / ↓ | Select previous / next visible row |
| Shift+↑ / Shift+↓ | Extend selection |
| Home | Select first row |
| End | Select last row |
| → | Expand block and select first child, or move to next sibling |
| ← | Collapse expanded block, or move to previous sibling |
| Backspace | Go to parent block / exit nested list |
| Enter | Open block properties (when properties panel is enabled) |
| Ctrl+Enter or Enter | Enter block (drill into first child list) (when navigation is enabled and properties dialog is off) |
| F2 | Focus inline editor on the selected row |
Edit & run
| Shortcut | Action |
|---|---|
| Ctrl+Z | Undo |
| Ctrl+Shift+Z or Ctrl+Y | Redo |
| Ctrl+C | Copy selected block(s) |
| Ctrl+V | Paste |
| Delete | Delete selected block(s) |
| Ctrl+S | Save document |
| R | Run selected block |
| Ctrl+R | Run chain from selected block (or current chain if none selected) |
Move blocks
Requires the move action to be enabled.
| Shortcut | Action |
|---|---|
| Ctrl+↑ / Ctrl+↓ | Move block up / down in list |
| Ctrl+← | Outdent (move out of nested list) |
| Ctrl+→ | Indent (move into previous sibling’s child list) |
Wiring view
Wiring shortcuts are global while the wiring canvas is shown (no need to focus the canvas first), except in typing contexts and overlays.
Selection & navigation
| Shortcut | Action |
|---|---|
| ↑ / ↓ | Select previous / next block in flow order |
| ← / → | Navigate linked scope variables when scope pins are shown (see below) |
| Space | Pan/zoom to selected block (~105% zoom) |
| Shift++, Shift+=, or Shift+Numpad + | Zoom in |
| Shift+− or Shift+Numpad − | Zoom out |
Scope variable navigation (only when scope variables are visible on blocks):
- ← on a block with linked scope vars: enter scope selection on the first linked variable.
- → while a scope var is selected: move to the next linked scope var, or return to the block.
- ← while a scope var is selected: move to the previous linked scope var, or return to the block.
Alt+arrow keys are reserved for view panel toggles and are not used for wiring navigation.
Edit & run
Same as the block list where applicable (including Ctrl+C / Ctrl+V cross-instance copy and paste):
| Shortcut | Action |
|---|---|
| Ctrl+C | Copy selected block to clipboard (serialized JSON, works across app instances) |
| Ctrl+V | Paste after the selected block, or append at list end if nothing is selected |
| Ctrl+Z / Ctrl+Shift+Z / Ctrl+Y | Undo / redo |
| Delete | Delete selected block, or delete selected wire/link |
| Backspace | Delete selected wire/link, or go to parent block |
| R | Run selected block |
| Ctrl+R | Run chain from selected block |
| Enter | Open properties (properties dialog) or enter/open block (navigation) |
| Ctrl+Enter | Enter/open block (navigation) |
Move blocks
| Shortcut | Action |
|---|---|
| Ctrl+↑ / Ctrl+↓ | Move block up / down |
| Ctrl+← / Ctrl+→ | Outdent / indent |
Bottom toolbar (display & view)
Matches the wiring footer toolbar left-to-right. Hover a button to see its Ctrl+N hint.
| Shortcut | Action |
|---|---|
| Ctrl+1 | Side pin layout |
| Ctrl+2 | Vertical pin layout |
| Ctrl+3 | Toggle scope variables |
| Ctrl+4 | Wired params preset |
| Ctrl+5 | All params preset |
| Ctrl+6 | Toggle show group |
| Ctrl+7 | Toggle show types |
| Ctrl+8 | Toggle show set values |
| Ctrl+9 | Toggle complete data flow |
| Ctrl+0 | Fit flow to view |
Space focuses the selected block or link (crosshair button). Delete removes a selected link when the remove action is available.
Use + / − (see Insert block palette) to add blocks at the selection or list ends.
Double-click a parameter row (input, output, or edge pin label) to open the properties panel, scroll to that field, and highlight it. Canvas double-click no longer zooms (use Shift+± or toolbar zoom instead).
Mouse complements (not keyboard)
Worth knowing when learning the wiring and tree UIs:
- Shift+click in the tree: range selection.
- Ctrl+click ( ⌘+click on Mac): toggle row in multi-selection.
- Click empty tree background: clear selection.
- Right-click a block: context menu (run, copy, delete, etc.).